How to Setup
In general, the Wizard is organized in multiple steps that you should go through in numerical order.
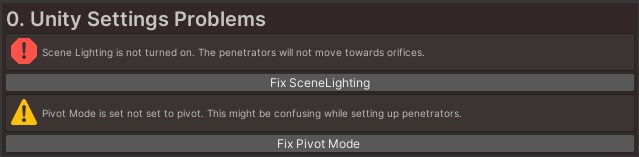
Step 0 - Auto Fixes
This section only shows up if your unity setup has configuration issues that will prevent you from being able to correctly place tps objects or see the penetrator deformation.
Scene Lighting: If your lighting is turned off in scene mode you will not see the penetrator move.Pivot Mode: If your pivot mode is not set to pivot point the placement of the unity tools will not represent where the origin of your penetrator is.
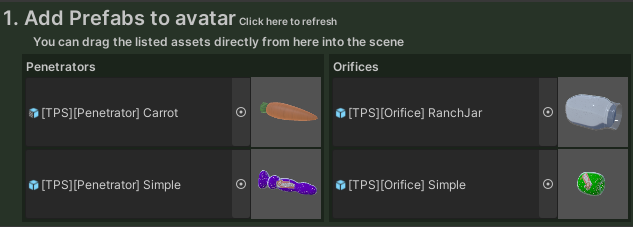
Step 1 - Add TPS objects
The 1st step of any tps setup is adding penetrators and orifices to your avatar. For this you can either
- Drag prefabs from the wizard onto your avatar
- Enable TPS on the material of your penetrators
- Create an orifice by placing an empty gameobject where you want it. Make sure the blue arrow points outwards from the orifice
To make custom penetrators or custom orifices check out the respected sections.
Always run the wizard after making changes to orifice / penetrator placement, including scaling and re-parenting.
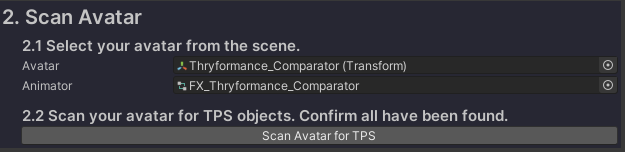
Step 2 - Configure + Run Wizard
Step 2.1 - Select your Avatar
Select your avatar root & its fx layer animator, then click the Scan Avatar for TPS button.
This will find all penetrators & orifices on your avatar.
- Penetrators are identified by having the
[TPS][Penetrator]prefix or by having TPS enabled on their materials. - Orifices are identified by having the
[TPS][Orifice]prefix or by having tps lights already setup.
Auto Fill
This step has a lot of optional automation.
- By default it will fill the field with an avatar from your scene, prioritizing the avatar with the most tps objects
- It will select the fx layer from your VRChat avatar descriptor
- If no fx layer is found you can create a new one & automatically assign it to your descriptor using the
Create Fx Layerbutton
Step 2.2 - Scan for TPS
After making changes to your setup while the Wizard is open you will have to rescan your avatar.
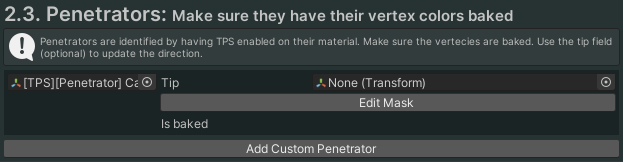
Step 2.3 - Configure Penetrators
Click the "Bake" button if it is available.
Baking
Penetrators can be Skinned or Static meshes. Static Meshes require no baking. Skinned meshes need their position & normals baked to a texture to function correctly.
Mask
You can add a mask to define which parts of your mesh should be deformed by TPS. This requires a black & white texture, white = deform, black = don't deform. The mask is a boolean mask and is read using the first uv channel. You need to rebake the penetrator after changing the mask as it is baked into the position / normal texture.
Tip
On your first setup or if you change the penetrator scale you should add a tip object. This is used to calculate the penetrator direction in case it is not aligned with the z direction.
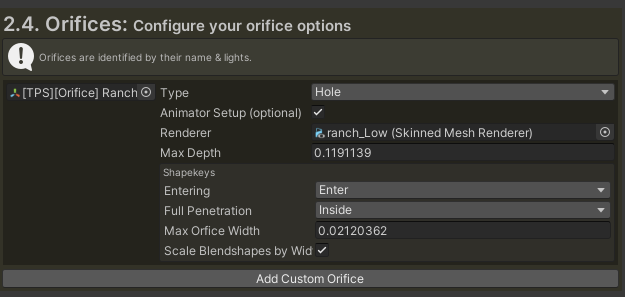
Step 2.4 - Configure Orifices
Required
Root: On the left side should be the transform of the orifice root. This will be auto filled by searching or should be assigned by you if creating a custom orifice.Type: Orifice type: Hole or Ring
Optional
The animator setup is optional. This allows you to drive shapekeys depending on penetration depth & penetrator size or even create custom animation based on those values.
Renderer: Renderer that has the shapekeys you want to drive.Max Depth: The maximum depth of your orifice. This determines when the depth value will be 1.0. This is initialized with the maximum vertex distance of the renderer in the orifice forward direction.Shapekeys - Entering: Shapekey that will be driven when the penetrator enters the orifice.Shapekeys - Full Penetration: Shapekey that will be driven when the penetrator is inside the orifice.Shapekeys - Max orifice width: Maximum opening width of the shapekeys. This is initialized with the maximum vertex offset of the shapekeys.Shapekeys - Scale by width: If this is enabled the shapekey animations will be scaled to open to the width of the current penetrator. For this the max orifice width needs to be correct.
The entering shapekey will be driven to zero (lerped) once fully inside the orifice.
Step 3 - Apply Setup
Always hit the Apply button after making changes to the setup.

Remove
Remove TPS From Animator & Physics
- Deletes all TPS properties from the animator
- Deletes all TPS layers from the animator
- Deletes all TPS VRC Contacts from the avatar
Remove TPS Objects
- Remove TPS From Animator & Physics
- Deletes all Orifices & Penetrators from the avatar
