AudioLink
AudioLink is a system that analyzes and processes in-world audio into many different highly reactive data streams and exposes the data to both Udon and custom shaders. For Avatars, this allows the ability to create a wide variety of visual effects that react to in-world audio in real time.
For more information on AudioLink, visit the website at https://audiolink.dev/ or view the GitHub Repository
In Poiyomi Shaders, there are various features that support AudioLink. However, they will only be available when AudioLink is activated on the Material.
Demonstration of various AudioLink effects on this Avatar, with the AudioLink Controller on the left. (Un-mute to hear sound)AudioLink
Type: Boolean
If enabled, activates AudioLink features and exposes AudioLink parameter controls for supported modules and effects.
When this feature activates, the following sections in Poiyomi Shaders will have their AudioLink properties exposed for you to use. Refer to each of their Documentation Entries for more information.
Anim Toggle
Type: Boolean
Animate this checkbox when creating toggles for AudioLink on this Material. Animating the Section Header will not work!
Smoothing
Bass
Type: Float, Range:0.0 - 1.0
Modifier for smoothing the Bass Band.
Low Mid
Type: Float, Range:0.0 - 1.0
Modifier for smoothing the Low Mid Band.
High Mid
Type: Float, Range:0.0 - 1.0
Modifier for smoothing the High Mid Band.
Treble
Type: Float, Range:0.0 - 1.0
Modifier for smoothing the Treble Band.
Overrides
Properties that allow animated overrides of the Audio Bands against AudioLink data from the World.
Band Overrides
Type: Boolean
Enables the Band Overrides function. These sliders will manually override the mentioned Band as if music is playing, except that now you're manually animating it's values.
This can be useful if you for some reason wish to use the Voice VRChat Parameter to also animate the forementioned Overrides in your Animator. As an example, you could use Voice to make those Bands have an effect when you speak.
Band Overrides Options
Bass
Type: Float4, Range:0.0 - 1.0
How much to override the Bass Band. A value greater than 0 will override the Band to the specified value.
Low Mid
Type: Float4, Range:0.0 - 1.0
How much to override the Low Mid Band. A value greater than 0 will override the Band to the specified value.
High Mid
Type: Float4, Range:0.0 - 1.0
How much to override the High Mid Band. A value greater than 0 will override the Band to the specified value.
Treble
Type: Float4, Range:0.0 - 1.0
How much to override the Treble Band. A value greater than 0 will override the Band to the specified value.
How to test AudioLink using Poiyomi Shaders
In order to see how AudioLink functions on your Material, you must set up the AudioLink package in Unity.
Below is a Video Tutorial on how to set it up, courtesy of Community Member Teeh.
Instructions
Here are text instructions on how to set up AudioLink, as explained in the video above:
- Use the VRChat Creator Companion and click Manage Project for your Unity Project.
- Under Manage Project, ensure you have Curated enabled in your
Selected Repos. Look forAudioLinkin your list. - Click the + Button on the listing for
AudioLinkto add it to your project.- If you cannot use Creator Companion, you can alternatively download the AudioLink "Minimal" Unity Package and install it to your Project. Get it here: https://github.com/llealloo/vrc-udon-audio-link/releases
- Launch Unity.
- In Unity, on the Menu Bar, click
Tools -> AudioLink -> Add AudioLink Prefab to Scene. A prefab namedAudioLinkAvatarshould be added to your Scene.- Alternatively, you can add
AudioLinkAvatar.prefabto your Scene by navigating in your Project Files toPackages/AudioLink/Runtime. You can then drag & drop theAudioLinkAvatar.prefabPrefab from there into your Scene's Hierarchy.
- Alternatively, you can add
- If you haven't already, activate AudioLink on your Poiyomi Material(s).
- Enter Play Mode and a music track should be audible. If you hear this, then AudioLink is now playing.
As the audio plays, you can fiddle around with the AudioLink settings on your Material while the music is continuously playing in the background. As you do this, the changes should be instantly reflected on your Avatar.
While in Play Mode, nothing will be saved other than your Materials. Make sure you exit Play Mode before you intend to do further edits to your Avatar!
Changing the Music
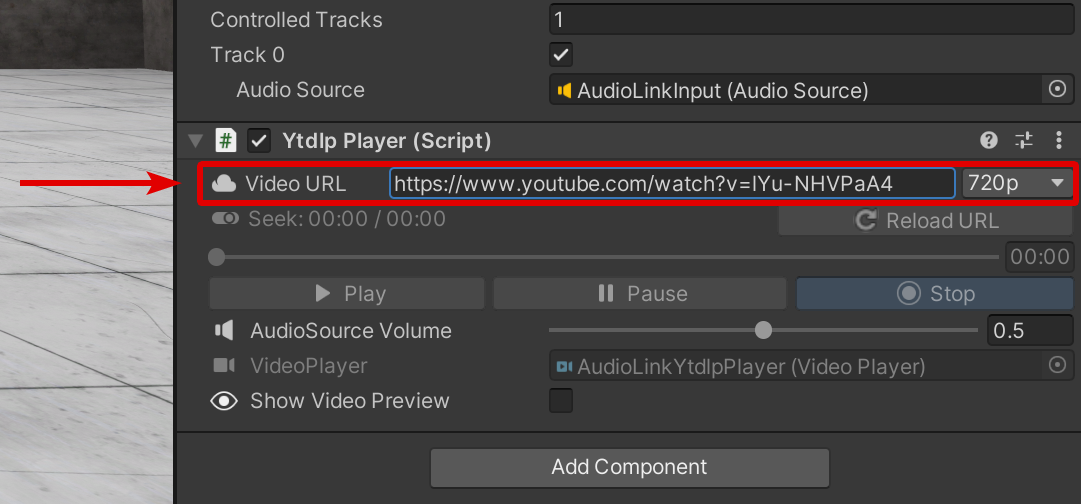
If you are not a fan of the music that is playing, feel free to change it! To do this, expand the AudioLinkAvatar Object in your Hierarchy. Select the Object named AudioLinkYtdlpPlayer.
You can then change the URL from the Inspector. Paste the new URL into the field as shown below. If you're already in Play Mode, click Reload URL to switch it.
Using a Custom YTDL Location
The AudioLinkAvatar Prefab uses the yt-dlp plugin from VRChat's installation files in order to test AudioLink in Unity. However oftentimes, the plugin provided by VRChat may sometimes break due to YouTube's destructive changes to the format. In cases where this happens, you can manually download the latest yt-dlp.exe and use it as the executable instead of the potentially outdated version provided by VRChat.
Setting a Custom YTDL Location is intended for Advanced Users. You do not need to do this if AudioLink is already working normally!
- Download the latest version of the
yt-dlp.exeexecutable from the GitHub Repository. - Place it in a location somewhere on your Computer that you'll remember.
- In Unity, navigate to the Menu option
Tools -> AudioLink -> Select Custom YTDL Location. This will open a pop-up window asking you to locate theyt-dlp.exeprogram that you downloaded.- Keep in mind, this is a global setting! It will apply to ALL Unity Projects!
- If successful, the Menu option
Select Custom YTDL Locationwill show a checkmark. This is indicating it's now using the customyt-dlp.exeyou've chosen. - Enter Play Mode and cross your fingers!
To debug if it's pointing to the custom location, select the AudioLinkYtdlpPlayer GameObject in the Scene and a Info message should appear in the Console. It may say something like, "[AudioLink:ytdlp] Custom YTDL location found: J:/ytdlp.exe"
If later on you wish to go back to using VRChat's provided yt-dlp.exe instead, click the option Tools -> AudioLink -> Select Custom YTDL Location again to disable it.