Optimizing Texture Memory (VRAM) & Size

2023-01-30: Updated with additional info, clarifications, and organization
- MEASURE TEXTURE VRAM USAGE AND DOWNLOAD SIZE using lox9973's Assetbundle Stat tool and Thry's VRAM estimator.
- Reduce Resolution in the texture import settings! Not every texture needs to be 2k or 4k.
- Don't disable mipmaps - Your materials will look and run better with them on!
- Crunch doesn't change VRAM usage but can reduce download size. Not a magic bullet!
- For Normal Maps, Use RG Compressed BC5 (From Platform overrides menu1). Normal Quality (DXT5nm) and High Quality (BC7) use the same VRAM but look worse.
- For textures with Alpha, Use High Quality (BC7). Normal Quality (DXT5) uses the same VRAM but looks worse.
- Don't use JPG (or other lossy formats) to store your source textures! Lower quality, with no benefit to VRAM/Download Size.
Background
In VRChat Creation, texture assets comprise a large portion (often the majority!) of map/avatar video memory (VRAM) usage, and a significant chunk of map/avatar download size (assetbundle size). In the latest update, VRChat has added an estimate of texture memory to the avatar stats menu, as it's an important component of GPU performance.
When the GPU can't store more assets in its memory, it has to swap them back and forth to the system memory (RAM). This works fine, but at best slows things down and causes hitching, and at worst, it can cause terribly low framerates and crashing.
Here's some notes on optimizing texture size, on both worlds and avatars, to reduce VRAM usage and download size. These are geared toward PC optimization, but outside of specific formats, they apply to mobile platforms (like Quest) as well.
Compression Stages
In the VRC creation pipeline, textures are compressed multiple times: when they're imported to Unity, to a gpu-readable format (determining the VRAM size), and when an assetbundle is built, with LZMA compression (kind of like a zip archive!), which reduces download size. Technically, there's also the source asset's compression (most formats have some, for efficiency), but as long as it's lossless, we don't need to care about it.
Knowing this, we can safely store source assets at their original resolution, losslessly (using formats like PSD, TGA, PNG, etc - don't use lossy ones like JPG, especially with data textures like normal maps!). The source asset file size on disk doesn't matter as the image data will be re-encoded in its entirety.
Compression Formats
GPU texture formats almost always have a fixed amount of data per pixel when loaded in memory. This means that (for example) a square BC7 texture at 512px with mipmapping on will always be 341.4 KB in VRAM, no matter what the texture data contains. This isn't as true for download sizes - LZMA compression can be more or less effective on different data, but we don't have as much control over that.
For non-crunched textures, the size in the texture preview will give the VRAM usage of an imported texture asset. For crunched textures, the preview size doesn't match VRAM usage! the usage will be the same as "Normal Quality" (DXT1/DXT5) for that texture. VRAM usage can be calculated using the Bits per pixel for a given format, which can be found in the Unity Documentation.
You can use the preview and game build views as a guide for (non-crunched) VRAM, and a very rough indicator of disk size, but verify with lox9973's Assetbundle Stat tool to confirm both VRAM usage contribution and final compressed bundle size. Thry's VRAM estimator and the VRAM estimation built into ThryEditor (used in Poiyomi) are also useful for this.
Crunch and You
Crunch compression is frequently talked about around the topic of avatar and world optimization. When optimizing filesize, you can use crunch compression for things that you can afford to lose quality on, and verify visually that it still looks OK. When using Crunch, test different crunch quality levels and measure the difference it makes in visual quality and filesize, and choose what works out best for your application.
Crunch pre-compresses textures in a way that's easy for the CPU to decompress at runtime, so it brings disk size down a bit (though not as much as it would appear from the preview, since there's assetbundle LZMA compression too!), but it always has to be uncrunched into DXT1 or DXT5 anyway.
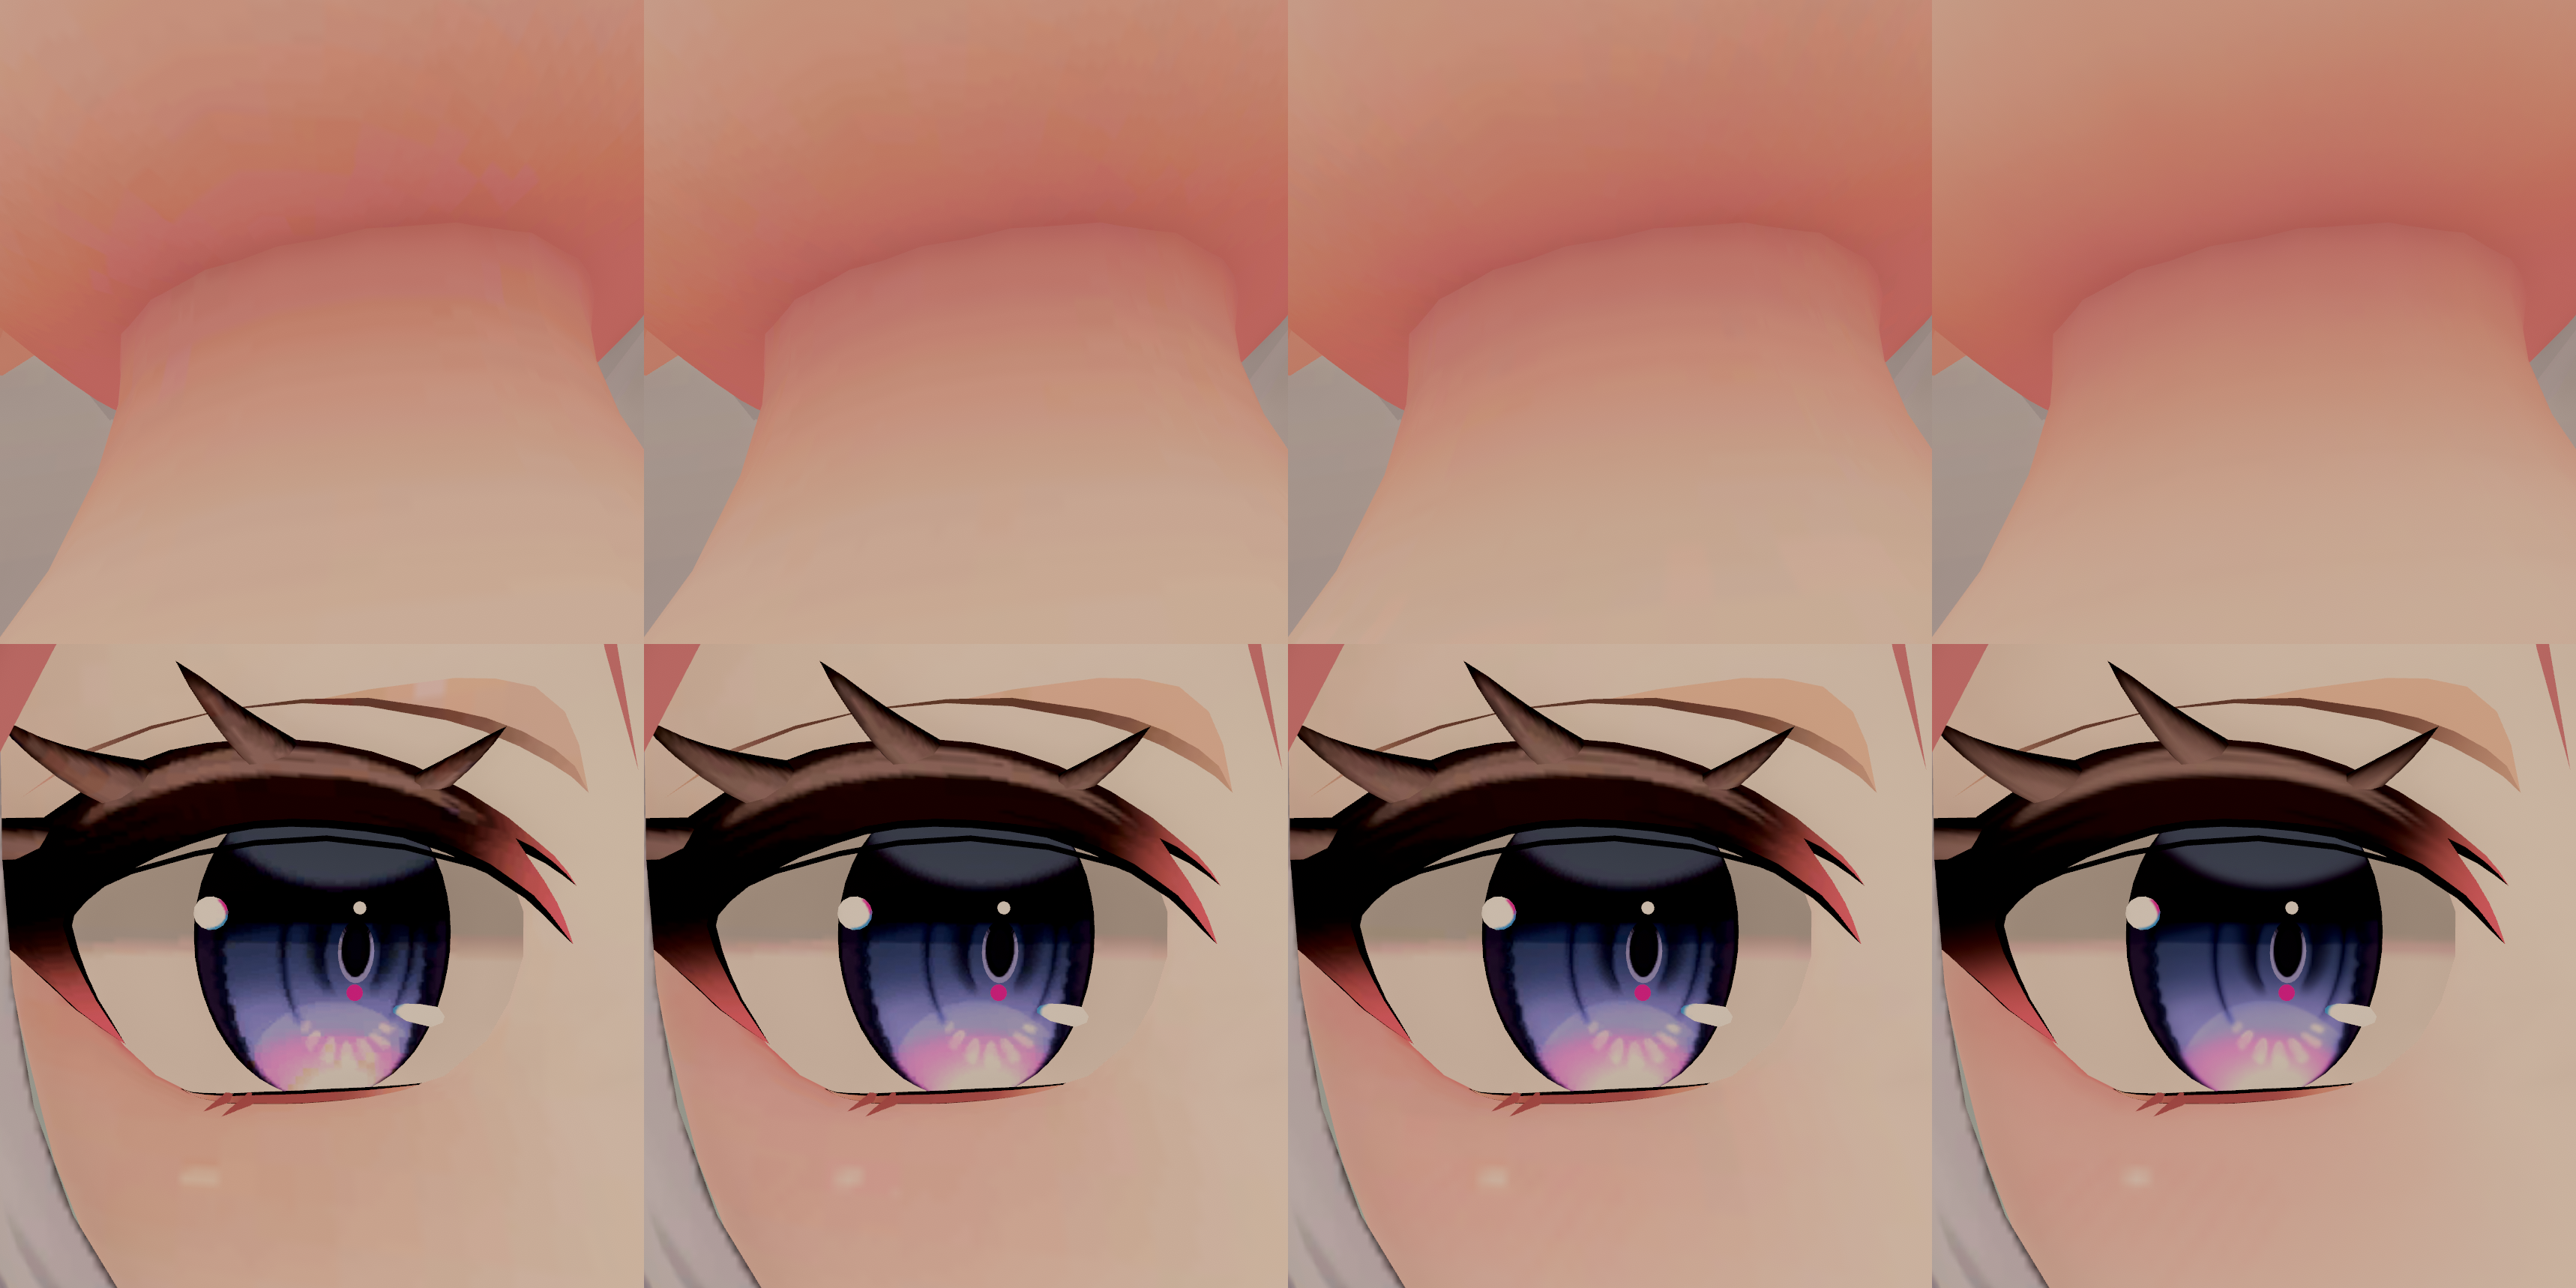
Left-to-Right: DXT1 Crunch (25 Quality), DXT1 Crunch (75 Quality), DXT1, BC7 (Open for full quality)
Recommendations
Different textures have different requirements. Here's some recommendations of what to use for what situation:
Color Textures
DXT1Crunch/DXT5Crunch("Use Crunch Compression") for simple colors that can take it, if you need the disk space. Always look at the visual quality, and again, Crunch does not affect VRAM usage, so this will use the same memory as "Normal Quality".DXT1("Normal Quality") for simple color textures. This setting should not be used if the source has an alpha channel, or if it contains smooth gradients - skin textures often look especially bad, as well as anything that's being hue shifted.BC7("High Quality") for anything else, especially if it has an alpha channel. It's higher quality and uses 8 bpp instead of 4, so textures usingBC7have twice the VRAM usage of ones usingDXT1, so as noted above, consider using High Quality at half the resolution instead of Normal Quality at the "full" resolution, as it may be an acceptable tradeoff.
Note that setting a texture to "High Quality" will override the crunch compression setting.
If you are using an alpha channel, either use BC7 ("High Quality") or crunch it (DXT5), depending on the application. using "Normal Quality" on a texture with an alpha channel is just a waste, as the DXT5 format it uses has the same VRAM usage as BC7. If your source texture has an alpha channel, but you don't need alpha, you can set "Alpha Source" to "None" in the texture import settings, which will let you either use DXT1 ("Normal quality") or BC7 with higher quality.
Normal Maps
DXTnm Crunch("Use Crunch Compression") for normal maps that do not need to be high quality. Crunch is not ideal for normal maps, so it often results in low quality results.- When not crunching, always use
BC51 or alternativelyBC7("High Quality") for Normal maps.BC7can cause some artfiacts and banding thatBC51, which stores the R and G channels as two separate BC4 channels, can help reduce. The default setting ofDXT5/DXTnm("Normal Quality") uses the same memory but looks worse!
Data/Other textures
DXT1("Normal Quality") for simple masks that don't have a lot of edges or high frequency detail.BC7for high-detail masksBC4/BC51 can be used for specific use cases, like single and dual channel masks. These formats can give high quality when you only need specific channels.- "None" for very small (smaller than 256px) textures that benefit from storing exact colors, like color ramps used for lighting and small gradients. These formats tend to be large, so be careful!
Reducing Resolution
To optimize both VRAM usage and download size, reduce resolution as much as possible for your application.
Textures in Unity are always re-encoded on import according to the texture import settings. That means you can non-destructively change the resolution size - you can always set the resolution in the texture import settings lower to optimize, without modifying the source texture. The vast majority of materials don't need high resolution textures (4k+) to look good.
Every time you halve the resolution of an image, you reduce the amount of pixels it has by a quarter - that means that while a square 4k BC7-encoded texture may take over 21MB in memory, the 2k version would be just a bit over 5MB!
It's important to note that while reducing resolution makes textures lower-fidelity up close, they will often look exactly the same at from even a little distance away, due to screen/headset resolution being limited. This is why AAA games don't use super high resolution textures everywhere - even in the most advanced modern games. Zoom out a bit when adjusting resolution - it might have less of an impact than you think!
If choosing between lower quality compression at higher resolution, and higher quality compression at lower resolution (ex. Normal Quality/Crunched at 2k vs High Quality at 1k), the latter option will often look better at all but the closest distance, due to how mipmapping works. This reduces VRAM usage, keeps download size roughly the same, and can improve the relative quality! Tools like the texture compression analysis tool included with d4rk's Avatar Optimizer can make this easier to analyze.
To maintain close-range details, one technique is to use low resolution base textures and tiled, low-resolution detail textures (especially normals). This lets you use multiple much smaller textures instead of a single larger one.
If you're having trouble maintaining details (lines or designs get blurry when lowering resolution), the mesh amy simply not have good texel density. This can be improved by improving the UV mapping of the mesh. Read more about this topic here and here.
PBR Textures
Textures used for PBR (Physically Based Rendering) materials often fit into 3 categories: Color, Normal, and Data. While it's beneficial to reduce res in general, PBR data textures can be an especially good place to reduce resolution.
- Color: textures that directly use the color for the material appearance, like Base Color (diffuse/albedo) and emission map textures.
- Normal: Normal maps, used to modify how the surface responds to light.
- Data: textures that contain data, like Metallic, Smoothness/Glossiness/Glossiness, Ambient Occlusion (AO) maps, and Height maps.
Color and normal textures often benefit directly from higher resolution, but you can often get away with a lot less resolution for data textures - try half (or a quarter) of the res of the main (color/normal) textures.
Overall Usage Guidelines
In terms of what overall usage to shoot for, we can think in terms of average GPU VRAM. According to the September 2022 Steam Hardware Survey, the most common VRAM amount for steam users is 8 GB, with about 35-40% of users having 8 GB or more - we'll use 8 GB as our reference number.
Doing some quick-and-dirty math, in a an instance with 80 avatars, if someone were to show every avatar and have it in view, each model would need to be under 100 MB of VRAM usage to stay below 8 GB total. That's before accounting for overhead from the operating system, the game itself, and the world hosting the instance. With that in mind, optimized avatars should shoot for under this - I usually aim for 80 MB or less on optimized avatars, but higher can be ok on models that will be used in less crowded spaces.
For worlds, it depends entirely on the content and intended usecase of the world. If you're building an event or party venue that's intended to host 80 people and heavy effects, you'll want to drop VRAM usage as low as it can go. The same is true for mobile-optimized worlds. However, for a more atmospheric world, intended to be experienced in small groups or alone, or where the focus is on beautiful, rich environments, higher resource usage can be justified. Exercise judgement and keep low-spec users in mind.
Don'ts
Don't Disable Mipmaps
Mipmaps improve both visual quality and performance. Disabling them isn't actually beneficial.
You should only disable mipmaps if it's something like a lookup table (LUT) or data texture (ex. font textures) that always needs the full texture resolution. While disabling them may reduce VRAM usage, it's not worth the hit to performance, and will make things look worse.
Please don't turn off mipmaps. Image courtesy Ben Golus
Don't just look at the build report
Unity's editor log will contain a breakdown of the build process, which some tools break out into a nice interface. While this can be useful, it won't be entirely accurate in describing how much space assets take up in the final bundle.
Don't use Hue Shifts with DXT1
This comes from a subtle technical detail - due to how DXT1 represents colors, it ends up having a limited hue palette in the red and blue channels. As a result, hue shifts applied to DXT1 encoded color textures can end up with blocky and bad results. (thanks to d4rkplayer for pointing this out!)
Conclusions
Choosing to optimize your creations benefits everyone that uses and experiences them, and improves the platform in general - when everything runs better, everything feels better.
Always measure and profile your usage. Tools like Lox9973's Assetbundle Stat tool, Thry's VRAM estimator, and d4rk's Avatar Optimizer (and the included texture compression analysis tool) are massively helpful in creating more optimized content.
Recognize that how materials, and their textures, are viewed is different between the creator building it (and often heavily self-scrutinizing) and other people that experience it. Make sure to step back and recognize that not everyone is going to be looking at the tiny details - focus on what matters in reasonable use cases.