Decals
Decals are used to place images onto a UV with specific location, rotation, and blending. 4 independent Decal sections are available, with extensive base and Audio Link options.
They can be used to add high resolution designs and details onto a mesh without the base texture having to be higher resolution, or to replace base textures entirely. This can allow fun and unique ways to decorate your Avatar with logos, shapes, stickers, or even as a blush emote toggle.
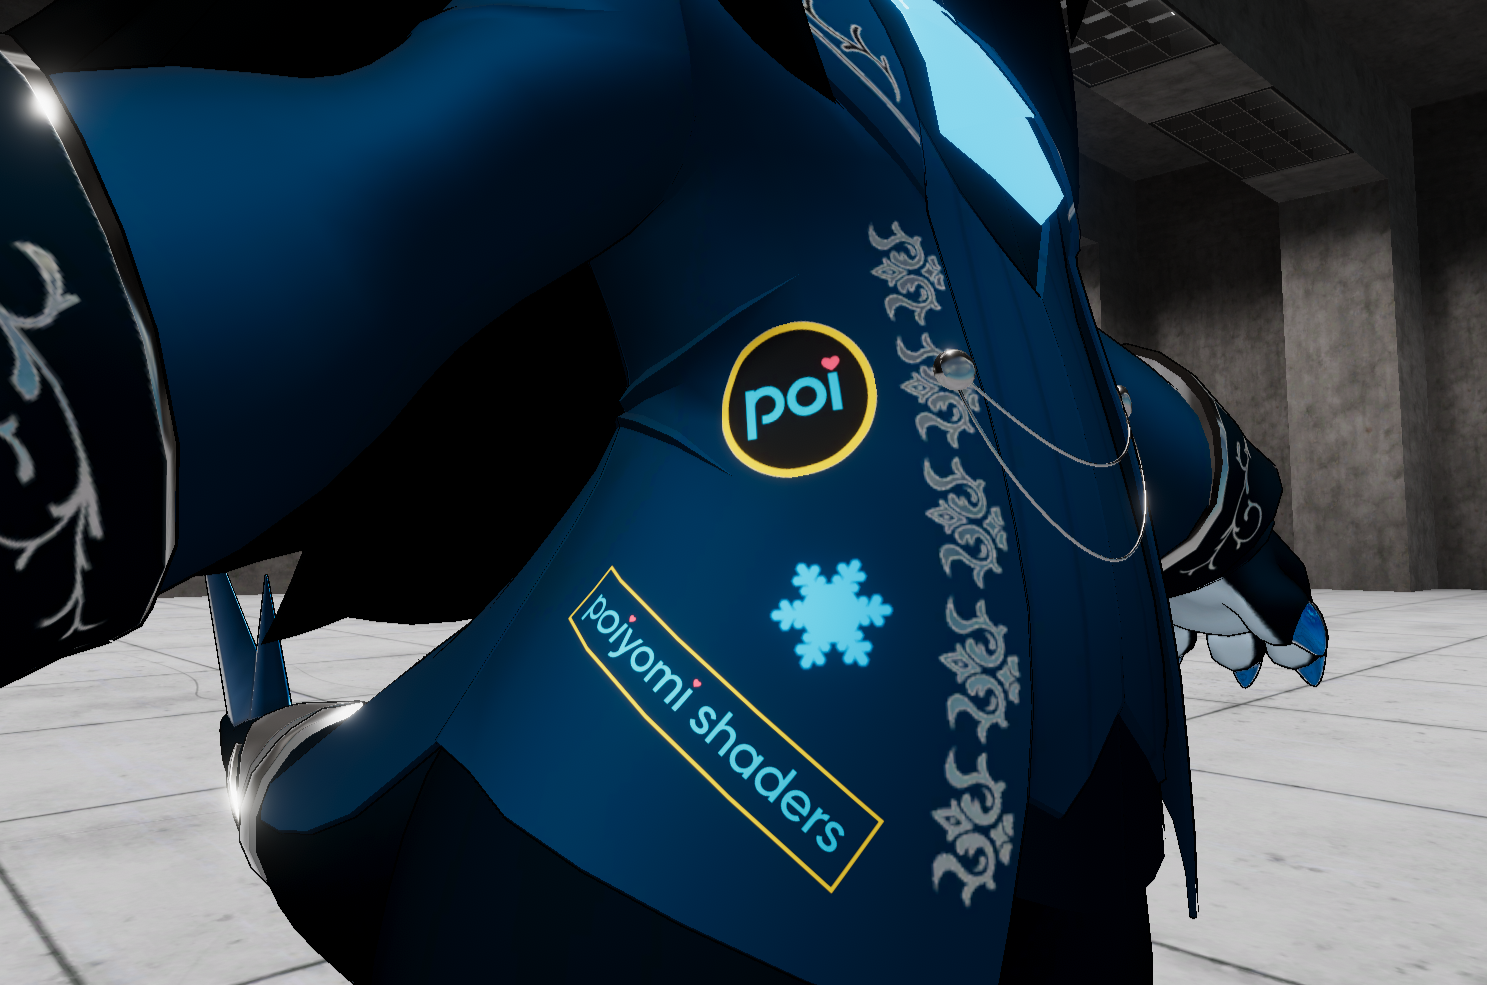
Example of 3 Decals placed on this Avatar's Jacket; a Poiyomi Shaders wordmark, the Poi Logo, and a Snowflake.
Decal RGBA Mask
- Type
- Texture Slot
- Accepts
- Data texturesRGB Off
A mask texture that defines where to place different decals. Each decal section can define which channel of the mask to sample from.
This texture defaults to pure white, so no masking will be applied with no texture defined.
Decal Slot
- Type
- Toggle
Enables the mentioned Decal slot.
Each of the 4 decal sections (0, 1, 2, 3) have the following options listed below. They are independent of each other and colors are blended in order of ID, according to their blend operation. Decal Emissions are always added with one another when overlapping.
Positioning
Decals supports the Raycast feature, which allows you to visually position a Decal on your Model without having to second-guess its exact UV coordinates.
To use this feature, edit the Decal on your Material directly from the Mesh as shown here:
Left-Click on the Raycast button to enable the feature. Hover the Mouse over your Mesh to position it, then Left-Click again to finalize your placement.
Position
- Type
- Vector2
- Default
- X0.5Y0.5
Where on the UV the decal's center should be.
Rotation
- Type
- Range
- Range
- 0to360
How much rotation to apply to the decal, around its center position.
Rotation Speed
- Type
- Float
A constant roatation speed applied to the decal. A value of 180 will rotate the decal once per second.
Scale
- Type
- Vector2
- Default
- X1Y1
Scale of the decal, in UV space. 1.0, 1.0 would map the decal to the entire UV square.
Side Offset
- Type
- Vector4
- Default
- X0Y0Z0W0
How much scale offset to define on each side of the decal.
Aspect Ratio
- Type
- Dropdown
- Options
- OffdefaultShrink to FitGrow to Fit
Sets the desired Aspect Ratio for the Decal.
Mirrored UV Mode
- Type
- Dropdown
- Options
- OffdefaultFlipLeft OnlyRight OnlyFlip Right Only
This option allows you to place Decals on Meshes that have problematic overlapping UVs, where two or more UV islands stack above each other. Use this to put Decals on just one side, or flip them on one side as well.
If your Decals appear normally in the intended location without it appearing in another area, you shouldn't need to use this setting!
While models with Overlapping UVs are becoming less and less common, there are still many models out there that suffer from this mistake. Only use this setting if this is the case on your end.
Symmetry Mode
- Type
- Dropdown
- Options
- OffdefaultSymmetryFlipped
This setting will divide the UV down the Center (at X = 0.5) and puts the Decal on Both Sides of the Symmetry, like a mirror. This only works on models that have a perfectly symmetrized UV layout.
Tiled
- Type
- Toggle
- Default
- Off
Whether or not the decal texture should be tiled. By default, decals are not tiled.
Color
- Type
- Color
- Default
- #FFFFFF
Base color for the decal texture. This is blended multiplicative with the Decal.
Decal
- Type
- Texture Slot
- Accepts
- Color texturesRGB On
The texture used for the decal. The alpha channel is used to define where the decal should be blended.
Mask Channel
- Type
- Dropdown
- Options
- RGBA
- Shown when
Decal slot is expanded
Which channel of the Decal RGBA mask to use for masking.
Emission Strength
- Type
- Range
- Range
- 0to20
How much Emission to apply from the Decal's Base Color. Higher values will yield a bloom-like effect in certain Worlds.
Color Blend Mode
- Type
- Dropdown
- Options
- ReplacedefaultDarkenMultiplyLightenScreenSubtractAddOverlayMixed
Which blending operation to use for the Decal's base color.
These are the same blending operators that are used in Adobe Photoshop.1
Alpha Blend Mode
- Type
- Dropdown
- Options
- OffdefaultReplaceMultiplyAddSubtractMinMax
- Type
- Dropdown
- Options
- EverywheredefaultDecal BoundsEverywhere MaskedBounds Masked
Which blending operation to use from the Decal's Alpha channel.
Alpha
- Type
- Range
- Range
- 0to1
How much to apply the blended color to the base color.
This slider can be animated to hide and show the decal. Animating the Section Header will not work!
Alpha Intensity
- Type
- Range
- Range
- 0to10
- Default
- 1
Applies a multiplier for how much the decal's alpha should affect the material's alpha.
Apply Video Effect
- Type
- Toggle
- Shown when
Video Effects is turned on
If enabled, will apply Video Effects to the Decal from it's global function.
Video Effects Brightness setting will override this module's Emissions as they are not cross-compatible!
Depth
- Type
- Range
- Range
- -0.5to2
- Default
- 0
How much parallax depth the decal should have. This can be used for layered parallax posters, or other unique designs.
Color Adjust
- Type
- Toggle
Enables the Color Adjustment sliders in Decals.
Saturation
- Type
- Range
- Range
- -1to10
- Default
- 0
Adjusts the saturation of the Decal.
A value of -1 will make the Decal fully de-saturate (grayscale). A value of 0 will not alter the color at all. A value greater than 0 will increase the saturation of the base color.
This is implemented as a lerp between the Decal and a grayscale version of the Decal.
Chromatize
- Type
- Range
- Range
- -1to10
- Default
- 0
Adjusts the intensity of the Decal's color reproduction and quality regardless of it's luminance.
Brightness
- Type
- Range
- Range
- -1to2
- Default
- 0
Adjusts the brightness of the Decal.
This increases or decreases brightness directly on top of the existing color, without regard for it's hue or tone.
Gamma
- Type
- Range
- Range
- 0.01to5
- Default
- 1
Adjusts the gamma of the Decal.
This can lerp the brightness of the Decal's color in regards to it's hue or tone. Lower values are more lighter, while higher values are more bolder.
Hue Shift
- Type
- Toggle
Enable or Disable hue shifting of the Decal.
Color Space
- Type
- Dropdown
- Options
- OKLabdefaultHSV
Choice of Color Space to use for the Hue Shift. By default, it will be set to OKLab.
Learn about the difference of Color Spaces as documented here in Color Adjust.
Select or Shift
- Type
- Dropdown
- Options
- Hue SelectHue Shiftdefault
This dropdown allows you to select how the Color Adjustment should behave when the Hue Shift is used. By default, this will be set to Hue Shift.
Select or Shift Options
Hue Select: Directly applies the selected Hue as an override to the entire Decal.Hue Shift: Only tints the Decal based on the lerped value. This is the default behavior.
Shift Speed
- Type
- Float
How much to constantly shift the decal hue with time. A value of 1 will result in a full hue shift cycle every 20 seconds.
Hue Shift
- Type
- Range
- Range
- 0to1
- Default
- 0
How much to shift the base color around the hue circle.
This value is circular, and will have the same result at 0 and 1.
Hue Angle Power
- Type
- Float
How much to shift the hue with surface angle. A value of 1 will give maximum hue shift when looking straight-on, and no hue shift cycle when looking side-on. The opposite effect can be achieved with negative values. Higher or lower values will produce more or less hue shift as the surface angle changes, creating the kind of effect seen on some holographic trading cards and iridescent materials.
Video Texture
- Type
- Toggle
Enables Video Texture to project on the Decal.
This feature enables a Video Texture to appear on the Decal. It will only work if a Video Player is broadcasting an _Udon_VideoTex Global Render Texture in the instance.
How to test Decal Video Textures
- Ensure you have the
AudioLinkAvatarPrefab in your Scene, as described here. - Inside the
AudioLinkAvatarPrefab, expand it and select the objectAudioLinkYtdlpPlayer. This is the same place where you specify a YouTube video to use when testing Audio Link. - On the bottom line, enable the checkmark called
Enable Global Video Texture. - The Decal Video Texture can now be tested and debugged in the Unity Editor while in Play Mode.
REMEMBER: Global Video Texture is NOT a part of Audio Link and is only provided as a convenience!
It's also worth knowing that there are not many Worlds out there supporting this feature. Currently, only Worlds that utilize the latest versions of ProTV 3.0 are able to broadcast Video Textures to shaders.
Aspect Ratio
- Type
- Dropdown
- Options
- Shrink2FitdefaultGrow2FitOff
Determines the Aspect Ratio of the Video Texture. You can specify to either fit within the boundaries of your Decal, or fill in the entire Decal boundaries.
Fit To Scale
- Type
- Toggle
- Default
- On
Changes the sizing of the Video Texture to fit to the Scale of the Decal.
Use Decal Alpha
- Type
- Toggle
- Default
- Off
Uses the Alpha of the Decal for the Video Texture.
Only Show Video
- Type
- Toggle
- Default
- Off
If enabled, will show ONLY the Video on the Decal.
Emission
- Type
- Range
- Range
- 0to20
- Default
- 0
Adjusts the Emissive effect of the Video Texture. Higher values will yield a bloom-like effect in some Worlds.
Chromatic Aberration
- Type
- Toggle
Enables a feature that turns the specified Decal into a Chromatic Aberration effect, which splits the colors alongside a specified angle.
Intensity
- Type
- Float
Amount of aberration to use, increasing it's distance. Higher values will yield more intense aberration.
Surface Angle Intensity
- Type
- Float
Adjusts how the surface influences the Angle intensity.
Hue
- Type
- Range
- Range
- -1to1
Modifies the chromatic hue on the aberration.
Direction
- Type
- Range
- Range
- -3.14to3.14
Adjusts the direction of the aberration.
Premultiply Alpha
- Type
- Toggle
Enables pre-multiplying the Alpha of your Decal for Chromatic Aberration.
Masking
Face Mask
- Type
- Dropdown
- Options
- OffdefaultFront OnlyBack Only
Choice of where the Decal should appear on your Normals. You can choose it to appear only on the Front Face, the Back Face, or Both (default).
Apply From Global Mask
- Type
- Dropdown
- Options
- Off1R1G1B1A2R2G2B2A3R3G3B3A4R4G4B4A
Select which Global Mask to apply directly onto the Decal.
Apply To Global Mask
- Type
- Dropdown
- Options
- Off1R1G1B1A2R2G2B2A3R3G3B3A4R4G4B4A
Select which Global Mask to send your Decal's effects onto the specified Global Mask.
Show On Outlines
- Type
- Toggle
If enabled, will show the Decal on Outlines.
Audio Link
The settings in this section will only be visible when Audio Link is activated on the Material.
Scale Band
- Type
- Dropdown
- Options
- BassLow MidHigh MidTrebleVolume
Which band of the audio to use for the Audio Link Scale Mod.
Scale Mod
- Type
- Float4
How much to modify (mod) the scale of the decal. These values are added to the current scale, and can be positive or negative.
| Channel | Function |
|---|---|
| X | Amount Added to X Scale with no audio in Scale Band |
| Y | Amount Added to Y Scale with no audio in Scale Band |
| Z | Amount Added to X Scale with max audio in Scale Band |
| W | Amount Added to Y Scale with max audio in Scale Band |
Side Band
- Type
- Dropdown
- Options
- BassLow MidHigh MidTrebleVolume
Which band to use for the Audio Link Side adjustment.
Side Mod Min
- Type
- Float4
How much to modify (mod) the side adjustment of the decal when there is no audio in the Side Band. These values are added to the current scale, and can be positive or negative.
| Channel | Function |
|---|---|
| X | Amount Added to X Left with no audio in Side Band |
| Y | Amount Added to X Right with no audio in Side Band |
| Z | Amount Added to Y Up with no audio in Side Band |
| W | Amount Added to Y Down with no audio in Side Band |
Side Mod Max
- Type
- Float4
How much to modify (mod) the side adjustment of the decal when there is maximum audio in the Side Band. These values are added to the current scale, and can be positive or negative.
| Channel | Function |
|---|---|
| X | Amount Added to X Left with max audio in Side Band |
| Y | Amount Added to X Right with max audio in Side Band |
| Z | Amount Added to Y Up with max audio in Side Band |
| W | Amount Added to Y Down with max audio in Side Band |
Rotation Band
- Type
- Dropdown
- Options
- BassLow MidHigh MidTrebleVolume
Which band to use for the Audio Link Rotation adjustment.
Rotation Mod
- Type
- Float2
How much to modify the rotation of the decal, in degrees.
| Channel | Function |
|---|---|
| X | Amount Added to rotation with no audio in Rotation Band |
| Y | Amount Added to rotation with max audio in Rotation Band |
Alpha Band
- Type
- Dropdown
- Options
- BassLow MidHigh MidTrebleVolume
Which band to use for the Audio Link Alpha adjustment.
Alpha Mod
- Type
- Float2
How much to modify the alpha of the decal.
| Channel | Function |
|---|---|
| X | Amount Added to alpha with no audio in alpha Band |
| Y | Amount Added to alpha with max audio in alpha Band |
Emission Band
- Type
- Dropdown
- Options
- BassLow MidHigh MidTrebleVolume
Which band to use for the Audio Link Emission adjustment.
Emission Mod
- Type
- Float2
How much to modify the Emission of the decal.
| Channel | Function |
|---|---|
| X | Amount Added to Emission with no audio in Emission Band |
| Y | Amount Added to Emission with max audio in Emission Band |
CC Strip
- Type
- Toggle
Enables or disables the ColorChord strip. ColorChord strip is a strip of colors that vary based on the audio, producing specific consistent colors for given chords.
Chrono Rotation Band
- Type
- Dropdown
- Options
- BassLow MidHigh MidTrebleVolume
Which band to use for the Audio Link Chrono Rotation adjustment.
Chrono Motion Type
- Type
- Dropdown
- Options
- Motion increases as intensity of band increases.Above but smooth.Motion moves back and forth as a function of intensity.Above but Smoooth.Fixed speed increase when the band is dark. Stationary when light.Above but Smooooth.Fixed speed increase when the band is dark. Fixed speed decrease when light.Above but Smoooooth.
Which motion type to use for the Chrono Rotation. Chronotensity is an Audio Link feature that allows time-dependent features, which shaders alone cannot do. In this case, chronotensity is used to create a time-dependent rotation of the decal.
Chrono Rotation Speed
- Type
- Float
How much chronotensity should affect the rotation of the decal. Good starting values are 0.1 - 0.5.
Color Override
- Type
- Toggle
Enables overriding the Color using Audio Link.
Color
- Type
- Color
Sets a Color to use as the Color Override.
Theme Color
- Type
- Dropdown
- Options
- Theme Color 0Theme Color 1Theme Color 2Theme Color 3ColorChord 0ColorChord 1ColorChord 2ColorChord 3AL Theme 0AL Theme 1AL Theme 2AL Theme 3
Option to set a Theme Color to use as the Color Override instead.
Color Override Band
- Type
- Dropdown
- Options
- BassLow MidHigh MidTrebleVolume
Which Band to use to trigger the Color Override.
Color Override Ramp
- Type
- Vector Curve
Vector ramp to determine how Color Override is used.