Global Masks
Global Masks are shader-wide texture channels that can be used for masking effects in almost every part of the shader. Global Mask channels can use information from Textures, Vertex Colors, or from other sections of the shader, such as Dissolve.
You can choose from a variety of blending modes when referencing a Global Mask channel, such as Replace, Multiply, Subtract, and more. Modifiers can be used to additionally restrict where effects are applied, such as Backface masking, Mirror/Camera masking, and Distance masking.
Global Masking expands the functionality of almost every part of the shader that supports it and can be a powerful tool for optimization.
This diagram above is a general idea of how a Global Mask can be used.
Using Global Masks
Each Global Mask uses the Red (R), Green (G), Blue (B), and Alpha (A) channels to define each Mask. Think of it as giving you 4 Masks in just 1 Texture. If used well, you can save yourself Texture Memory (VRAM) with a combined Global Mask Texture that represents 4 of your Masks.
Since you have a total of 4 Global Masking slots, each providing 4 Color Channels, you can have up to 16 Color Channels to use for your Masks.
Below is a video introduction to Global Masking, courtesy of community member Teeh. This also briefly covers it's sister feature Global Themes as well.
Creating a Global Mask
These Global Masks can be created in two ways. You can use either the Thry Editor Texture Packer, or specify your own Global Mask.
Method 1: Thry Texture Packer
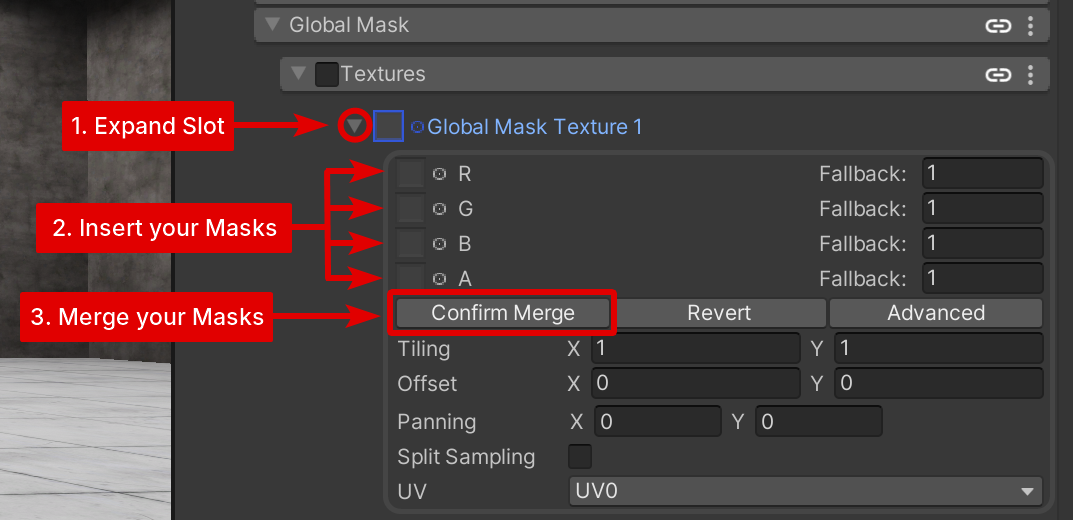
The easiest method to use Global Masks in Poiyomi Shaders is by using Masks you already use. You can utilize the Thry Editor Texture Packer integrated to combine your masks into your own custom Global Mask. This can be done in each Global Mask slot available to you.
To merge your Maps, expand the Global Mask slot of your choice, insert your Masks in each Channel, then click Confirm Merge.
Once done, see how to use them in Usage in the Shader.
Method 2: Provide your own Texture
Another way of creating Global Masks is by the use of software, such as Substance 3D Painter, to pack your User channels into an R + G + B + A Texture way in advance. To do this, you would have to add the User channels and paint on those channels you specify. We offer an example Export Template that shows the usage of this, which you can download from here.
After exporting your t_$textureSet_GlobalMask.png file, slot it directly into one of the Global Mask slots. See Usage in the Shader below to see how to use them.
Usage in the Shader
Once you specify your Global Masks, you will instead select the Global Mask Dropdown in supported sections in the Shader. This is where you select the Mask Channel you wish to use for that section. They will look something like this:
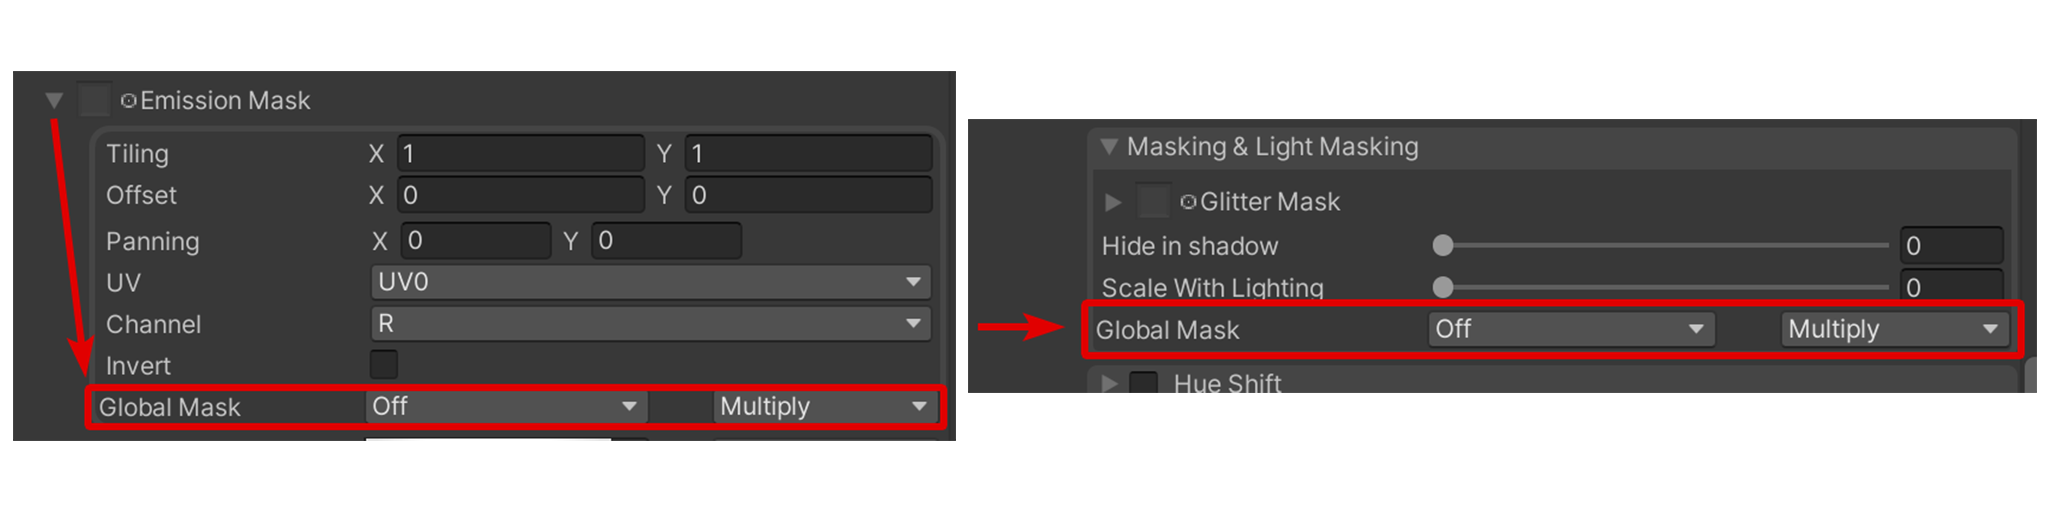
The selection of your Global Masks use a naming scheme to identify which Global Mask to use. To understand how they are used, the first number refers to the Global Mask Slot, while the Letter represents the Channel in that specific Global Mask. See the note below for more information.
Material Properties
We will use the word "Mask Channel" to identify the property that represents the Channel to use. This could be either 1R, 1G, 2A, 3B, 4A, etc.
Keep in mind how the names are used. For example: if the channel is 2G, it means it's representing Global Mask 2 and the Green (G) channel on that Mask.
Textures
Type: Toggle
Enables the Global Mask Textures feature.
This is the flagship feature of Global Masks. Here, you can specify up to 4 Global Masks to use on your Material.
As a reminder, the Global Mask Slot you use will determine how you select it elsewhere in your Material.
Global Mask 1
Type: Data Texture (sRGB = Off)
Texture Slot defining the first Global Mask. This will represent Global Masks 1R, 1G, 1B, and 1A.
Global Mask 2
Type: Data Texture (sRGB = Off)
Texture Slot defining the secondary Global Mask. This will represent Global Masks 2R, 2G, 2B, and 2A.
Global Mask 3
Type: Data Texture (sRGB = Off)
Texture Slot defining the tertiary Global Mask. This will represent Global Masks 3R, 3G, 3B, and 3A.
Global Mask 4
Type: Data Texture (sRGB = Off)
Texture Slot defining the forth Global Mask. This will represent Global Masks 4R, 4G, 4B, and 4A.
Vertex Colors
This section allows you to use Vertex Colors on your Mesh as a Global Mask.
Linear Colors
Type: Toggle- Default:
On
- Default:
Enable to use Linear Colors from your Vertex Colors. This is typically recommended so that the shader can accurately read them.
Red
Type: Dropdown, Options:Off/1R/1G/1B/1A/2R/2G/2B/2A/3R/3G/3B/3A/4R/4G/4B/4A
Specify which Vertex Colors from the Red Channel to be applied to your Global Mask.
Green
Type: Dropdown, Options:Off/1R/1G/1B/1A/2R/2G/2B/2A/3R/3G/3B/3A/4R/4G/4B/4A
Specify which Vertex Colors from the Green Channel to be applied to your Global Mask.
Blue
Type: Dropdown, Options:Off/1R/1G/1B/1A/2R/2G/2B/2A/3R/3G/3B/3A/4R/4G/4B/4A
Specify which Vertex Colors from the Blue Channel to be applied to your Global Mask.
Alpha
Type: Dropdown, Options:Off/1R/1G/1B/1A/2R/2G/2B/2A/3R/3G/3B/3A/4R/4G/4B/4A
Specify which Vertex Colors from the Alpha Channel to be applied to your Global Mask.
Backface Masking
Type: Toggle
Enables control on how your Global Masks appear on the Backface.
Mask Channel
Type: Dropdown, Options:Front Only/Back Only/Both- Default:
Both
- Default:
For each channel, you can choose where the Global Mask appears on. You can choose the Front Face, the Back Face, or Both Faces.
By default, Both will be set.
Mirror Masking
Type: Toggle
Enables control of how your Global Masks appear on Mirrors in VRChat.
Mirror Detection Mode
Type: Dropdown, Options:Generic/VRC
Choose the detection mode of how the Global Mask treats the Mirror.
Mask Channel
Type: Dropdown, Options:Both/Only Outside Mirror/Only In Mirror
Choose how the channel appears in Mirrors.
Camera Masking
Type: Toggle
Enables control of how your Global Masks appear in VRChat Cameras.
Camera Masking will only exclusively work in VRChat.
Mask Channel
Type: Dropdown, Options:Both/Only Outside Camera/Only In Camera
Choose how the channel appears in Cameras.
Distance Masking
Type: Toggle
Enables Distance Masking, which controls how the Global Mask appears based on the Camera's distance to the Mesh this Material is used on.
Mask Channel
Type: Toggle
Enables the Mask Channel to be used with your Distance Masking.
Pos To Use
Type: Dropdown, Options:Object Position/Pixel Position
Which position to use to calculate distance.
Object Position will calculate distance relative to the origin of the object, resulting in the whole object having a uniform alpha change. This is useful for making an entire mask change alpha based on the distance from the object itself.
Pixel Position will calculate distance relative to the position of each pixel. This means different parts of an object can have different levels of alpha. This is useful for making parts of the mask appear or disappear based on distance without the whole object being affected.
Min Distance
Type: Float
The distance (in meters) at which the Min Distance Alpha multiplier will be applied.
Max Distance
Type: Float
The distance (in meters) at which the Max Distance Alpha multiplier will be applied.
Min Distance Alpha
Type: Float, Range:0.0 - 1.0
The alpha multiplier that will be applied at the Min Distance.
Max Distance Alpha
Type: Float, Range:0.0 - 1.0
The alpha multiplier that will be applied at the Max Distance.
Blending
Type: Dropdown, Options:Replace/Multiply
Choose how the Distance Masking are blended in your Material.