Outlines
The Outlines feature creates outlines using a simplified pass with the mesh offset by a small amount, also known as an "Inverted Hull" technique.
For smooth meshes, the inverted hull technique works well, but for hard-edged models, it can have noticeable seams. To correct this, you can bake a version of the mesh with smoothed normals baked into the vertex color, using the Poi Vertex Color Baker. This will overwrite other vertex color data, and will create a unique version of the mesh.
Outlines are known for it's distinctive "lines" traced around characters and objects in various 2D cartoons seen in popular culture.
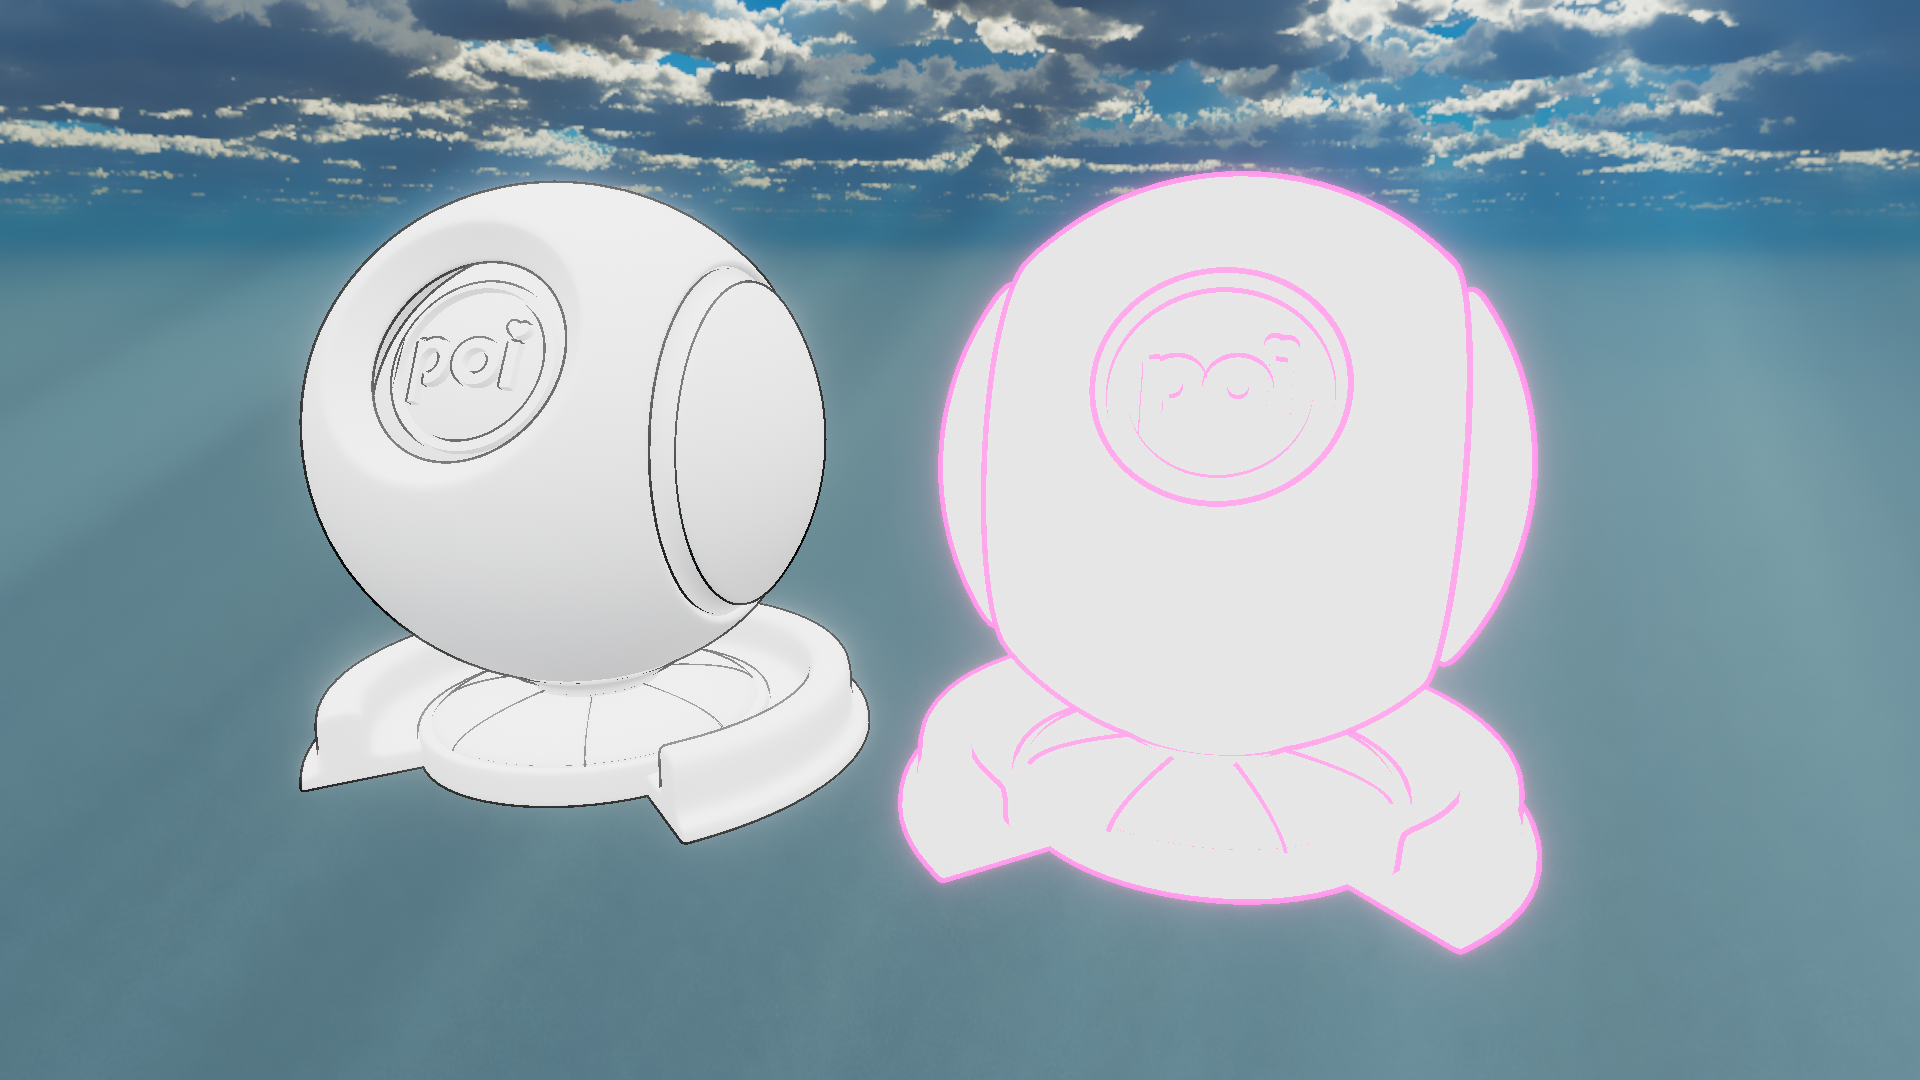
Example of the inverted hull Outline technique on two Material Spheres.
Render
Type: Dropdown, Options:Regular/Render Feature (URP)- Default:
Regular
- Default:
Toggles rendering the feature in URP. Only affects the URP version of Poiyomi Shaders.
Mode
Type: Dropdown, Options:Basic/Rim Light/Directional/Drop Shadow- Default:
Basic
- Default:
Changes the mode of the outline.
Basic
Default mode. The width of the outline is constant around the model.
Rim Light
Rim Light actually uses the direction of the light to determine the width of the outline. Outlines will be thicker in the direction of the light. The color of the outline will be tinted with a value between the direct light color and the base color, according to the Rim Light Blend.
Rim Light Blend
Type: Float, Range:0.0 - 1.0
How much to blend between the base color and the direct light color as the tint of the outline. At 0, the outline will be tinted with the base color. At 1, the outline will be tinted with the direct light color.
Only available when mode is set to Rim Light.
Directional
Directional is similar to Rim Light in that it biases the outline to a specific direction, but the Directional Offset directly specifies what direction to use.
Directional Offset X Y
Type: Vector4 (OnlyX/Yused)
Direction to use for the outline. Calculated from only the X (horizontal) and Y (vertical) values.
Drop Shadow
Drop Shadow is similar to Directional in that it biases the outline to a specific direction, but drop shadow moves the outline in X, Y, and Z, instead of specifying a direction to bias the thickness.
In Drop Shadow mode, the Width is not used.
Drop Direction X Y
Type: Vector4 (OnlyX/Y/Zused)
How much to offset the outline in the X, Y, and Z directions, in unity base units.
Space
Type: Dropdown, Options:Local/World- Default:
Local
- Default:
Determines where the size of the Outlines should assume the initial scale units from. Influences the Outline Size.
Localrenders the Size based on the Scale Units of your Avatar.Worldrenders the Size based on World Units.- Keep in mind that Outline Size will remain the same regardless of Avatar Scale if using
World.
- Keep in mind that Outline Size will remain the same regardless of Avatar Scale if using
Outline Size
Type: Float
Thickness of the Outline, in Unity base units (scaled down by 100).
Animate this Float value if you're planning to create toggles for Outline visibility on this Material. Animating the Section Header will not work!
Outline Size Mask
Type: Data Texture (sRGB = Off)
Mask Texture in Grayscale that determines the thickness of the Outline in various places on the model. Areas in darker Grayscale will reduce the thickness based on the initial Outline Size value set.
Examples:
- If your Outline Size is
0.5and a section of your Texture is 50% Gray, it will reduce the thickness in that area to about0.25thickness, which is half of your Outline Size. - If a section of your Texture is Black, it will reduce the thickness all the way down to
0thickness.- If Clip 0 Width is enabled in this scenario, the Outline will be clipped entirely.
This determines the Outline Width per-vertex, not per-pixel.
Outline Texture
Type: Data Texture (sRGB = On)
Texture to use for the Outline. Will be tinted based on the Color Adjust settings.
Color
Type: Color
Base Color of the Outline. Can be mixed in various ways depending on the Mode settings.
Outline Emission
Type: Float, Range:0.0 - 20.0
How much Emission the Outline should have. Creates a glowing effect, especially in Worlds with Post Processing Bloom.
Main Texture Blend
Type: Float, Range:0.0 - 1.0
How much the Outline Color should be blended with your Texture.
UTS2-style Blend
Type: Toggle
Determines if you want the Outlines to blend in a way that is similar to Unity-Chan Toon Shader 2 (UTS2).
Highlight
Type: Toggle
Enables Highlighting on the Outlines, rendered based on environmental lighting like a gradient. This matches Lil Toon's Outline Highlighting feature.
Highlight Color
Type: Color
Sets the Color of the Highlight. Will blend with the main Outline color.
Highlight Emission
Type: Float, Range:0.0 - 20.0
How much Emission the Highlight should have. Creates a glowing effect, especially in Worlds with Post Processing Bloom.
Tint From Outline Texture
Type: Toggle
Enables tinting the Highlight based on the specified Outline Texture configuration.
Border
Type: Float, Range:0.0 - 1.0
Sets the location of the Highlight's border.
Blur
Type: Float, Range:0.0 - 1.0
Sets how much to blur the border of the Highlight.
Receive Shadow
Type: Toggle
If enabled, will allow the Highlight to receive shadows.
Color Adjust
Type: Toggle
Enables the ability to modify the Outline Color in a similar fashion to Color Adjust. This is applied directly after the main Outline Color, and will not affect other sections that modify the base Outline Color.
Color Space
Type: Dropdown, Options:OKLab/HSV
Choice of Color Space to use for the Hue Shift. By default, it will be set to OKLab.
Learn about the difference of Color Spaces as documented here in Color Adjust.
Shift Speed
Type: Float
How much to constantly shift the Outline Hue with time. A value of 1 will result in a full hue shift cycle every 20 seconds.
Hue
Type: Float, Range:0.0 - 1.0
How much to shift the Outline Color around the Hue Circle.
Saturation Style
Type: Dropdown, Options:Saturation Value (old)/Saturation Brightness- Default:
Saturation Brightness
- Default:
Selects the type of Saturation or Brightness style to use.
This dropdown is provided for backwards-compatibility with both old 9.3 and newer 10.0 animation setups. The setting of this dropdown will affect what values are exposed here.
Saturation Value (old)will use the old system with the Saturation Adjust and Value Adjust sliders exposed.Saturation Brightnesswill use the NEW system with modern Saturation and Brightness sliders exposed.
Saturation
Type: Float, Range:-1.0 - 10.0- Normal:
0.0 - Conditional: Requires Saturation Style set to
Saturation Brightness.
- Normal:
Adjusts the saturation of the Outlines.
A value of -1 will make the Outlines fully de-saturate (grayscale). A value of 0 will not alter the color at all. A value greater than 0 will increase the saturation of the color.
This is implemented as a lerp between the base color and a grayscale version of the base color.
Brightness
Type: Float, Range:-1.0 - 2.0- Normal:
0.0 - Conditional: Requires Saturation Style set to
Saturation Brightness.
- Normal:
Adjusts the brightness of the Outlines.
This increases or decreases brightness directly on top of the Outlines, without regard for it's hue or tone.
Saturation Adjust
Type: Float, Range:-1.0 - 1.0- Normal:
0.0 - Conditional: Requires Saturation Style set to
Saturation Value (old).
- Normal:
Adjusts the Saturation of the Outlines.
A value of -1 will make the Outlines fully de-saturate (grayscale). A value of 0 will not alter the color at all. A value greater than 0 will increase the saturation of the Theme Color.
Value Adjust
Type: Float, Range:-1.0 - 1.0- Normal:
0.0 - Conditional: Requires Saturation Style set to
Saturation Value (old).
- Normal:
Adjusts the brightness value of the Outlines on top, without regard for it's Hue or Tone.
Gamma
Type: Float, Range:0.01 - 2.0
Lerps the brightness of the Outlines in regards to it's hue or tone.
Distance Alpha
Type: Toggle
When enabled, Distance Alpha can modify the Alpha value of the Outlines based on the distance from the Camera to the Object or Pixel.
Distance Alpha requires Transparency in order for it to work.
Pos To Use
Type: Dropdown, Options:Object Position/Pixel Position
Which position to use to calculate distance.
Object Positionwill calculate distance relative to the origin of the Outline, resulting in the whole Outline having a uniform alpha change. This is useful for making an entire Outline change alpha based on the distance from the Outline itself.Pixel Positionwill calculate distance relative to the position of each pixel on the Outline. This means different parts of an Outline can have different levels of alpha. This is useful for making parts of an Outline appear or disappear based on distance without the whole Outline being affected.
Min Distance Alpha
Type: Float, Range:0.0 - 1.0
The alpha multiplier that will be applied at the Min Distance.
Max Distance Alpha
Type: Float, Range:0.0 - 1.0
The alpha multiplier that will be applied at the Max Distance.
Min Distance
Type: Float
The distance (in meters) at which the Min Distance Alpha multiplier will be applied.
Max Distance
Type: Float
The distance (in meters) at which the Max Distance Alpha multiplier will be applied.
Fixed Size Over Distance
Type: Toggle- Default:
true
- Default:
Enables a fixed screen-space size for outlines. This can allow control of the outlines to not get smaller when moving away from the model.
Fixed Width
Type: Float, Range:0.0 - 1.0- Default:
0.5
- Default:
The width of the fixed outline size.
Fixed Size Max Distance
Type: Float- Default:
1
- Default:
How far away from the model to use the fixed size outlines in Unity Base Units. Beyond this distance, the outlines will properly scale accordingly.
Keep your Max Distance value at a small number in order to ensure they scale correctly without blocking your Avatar's visibility when viewed at a far distance!
Lighting
Type: Toggle- Default:
true
- Default:
Enables lighting for the Outline. This darkens the outline color in shadowed areas.
Shadow Strength
Type: Float, Range:0.0 - 1.0
Shadow intensity of the Outlines.
Vertex Colors
Vertex Color Normals
Type: Toggle
Use the vertex colors of the model, if they've been specially prepared. The (smoothed) vertex colors are used as the normal data.
Vertex Color Mask
Type: Dropdown, Options:Off/R/G/B/A
Choose which Color channel to use in your Mask for the Vertex Colors.
Audio Link
The settings in this section will only be visible when Audio Link is activated on the Material.
Size Band
Type: Dropdown, Options:Bass/Low Mid/High Mid/Treble/Volume
Which Band to use for the Outline Size adjustment.
Size Mod
Type: Vector2
How much to add to or subtract from the Outline Size with Audio.
| Modifier | Function |
|---|---|
| Min | Amount changed to Outline Size with No Audio in Size Band |
| Max | Amount changed to Outline Size with Max Audio in Size Band |
Emission Band
Type: Dropdown, Options:Bass/Low Mid/High Mid/Treble/Volume
Which Band to use for Outline Emission adjustment.
Emission Mod
Type: Vector2
How much to add to or subtract from the Outline Emission Intensity with Audio.
| Modifier | Function |
|---|---|
| Min | Amount changed to Outline Emission with No Audio in Emission Band |
| Max | Amount changed to Outline Emission with Max Audio in Emission Band |
Highlight Emission Band
Type: Dropdown, Options:Bass/Low Mid/High Mid/Treble/Volume
Which Band to use for Highlight Emission adjustment.
Highlight Emission Mod
Type: Vector2
How much to add to or subtract from the Highlight Emission Intensity with Audio.
| Modifier | Function |
|---|---|
| Min | Amount changed to Highlight Emission with No Audio in Highlight Emission Band |
| Max | Amount changed to Highlight Emission with Max Audio in Highlight Emission Band |
Color Override
Type: Toggle
Enables overriding the Color using Audio Link.
Band
Type: Dropdown, Options:Bass/Low Mid/High Mid/Treble
Which Band to use to trigger the Color Override.
Color
Type: Color
Sets a Color to use as the Color Override.
Theme Color
Type: Dropdown, Options:Theme Color 0/Theme Color 1/Theme Color 2/Theme Color 3/ColorChord 0/ColorChord 1/ColorChord 2/ColorChord 3/AL Theme 0/AL Theme 1/AL Theme 2/AL Theme 3
Option to set a Theme Color to use as the Color Override instead.
Color Override Ramp
Type: Vector Curve
Vector ramp to determine how Color Override is used.
Highlight Color Override
Type: Toggle
Enables overriding the Highlight Color using Audio Link.
Band
Type: Dropdown, Options:Bass/Low Mid/High Mid/Treble
Which Band to use to trigger the Highlight Color Override.
Color
Type: Color
Sets a Color to use as the Highlight Color Override.
Theme Color
Type: Dropdown, Options:Theme Color 0/Theme Color 1/Theme Color 2/Theme Color 3/ColorChord 0/ColorChord 1/ColorChord 2/ColorChord 3/AL Theme 0/AL Theme 1/AL Theme 2/AL Theme 3
Option to set a Theme Color to use as the Highlight Color Override instead.
Color Override Ramp
Type: Vector Curve
Vector ramp to determine how Highlight Color Override is used.
Outline Rendering Options
Clip 0 Width
Type: Toggle
Enables clipping of the outline if a vertex has 0 outline thickness.
If using an Outline Size Mask, all areas that are marked in Black will be clipped when this option is enabled. This can be useful for certain areas of your Avatar that have inverted normals, such as the Eyes.
Override Base Alpha
Type: Toggle
Sets the base fragment Alpha to the Outline's Alpha value.
Cull
Type: Dropdown, Options:Off/Front/Back- Default:
Front
- Default:
Which faces to cull. For the inverted hull technique, this should be set to Front.
ZWrite
Type: Dropdown, Options:Off/On- Default:
On
- Default:
Determines whether the Outlines should write to the depth buffer. This should typically be ON by default.
ZTest
Type: Dropdown, Options:Disabled/Never/Less/Equal/LessEqual/Greater/NotEqual/GreaterEqual/Always- Default:
LessEqual
- Default:
Sets how the Outline Stencil should test the depth buffer. By default, the depth buffer is tested, and if the depth value is not less than or equal to the current value, the Outline is discarded.
Outline Z Offset
This area controls the Camera Z Position when rendering Outlines. This is useful for giving control over the clipping of the Outlines in certain areas of your mesh.
Overall Strength
Type: Float- Default:
0
- Default:
How much to offset the Camera Z Position. This property was previously known as Cam Z Offset.
Outline Mask Channel
Type: Dropdown, Options:R/G/B/A
Which channel to use from the Outline Size Mask to control the Outline Z Offset.
Mask Strength
Type: Float, Range:0.0 - 1.0
Controls the strength of the Outline Mask Channel used for the Outline Z Offset.
Invert Mask Channel
Type: Toggle
If enabled, will invert the value from the Outline Mask Channel.
Vertex Color Channel
Type: Dropdown, Options:Off/R/G/B/A
Which Vertex Color channel to use to control the Outline Z Offset.
Vertex Color Strength
Type: Float, Range:0.0 - 1.0
Controls the strength of the Vertex Color Channel used for the Outline Z Offset.
Outline Vertex Color Baker
The Outline Vertex Color Baker is an included utility used to create a version of your meshes that has smoothed Vertex Colors baked for Outlines. It can help eliminate sharp edges on your mesh so that Outlines can look as smooth as possible.
To use it,
- Open the panel
Poi/Vertex Color Bakerfrom the Unity Menu. - Select your Avatar from the Scene.
- Select which Meshes to target. It will ask you how much to "shrink" the tips of the Edges by a certain amount.
- Generate the Mesh to Test the results. A clone of your Mesh will appear in your Scene showing your results.
- IMPORTANT: Ensure your Materials have
Vertex Color Normalsenabled in your Outlines settings in order to see results!
- IMPORTANT: Ensure your Materials have
- Hit
Saveif you're happy with the changes. You can then use the newly-created Clone in your scene labeled with(VertexColorBaked), OR link the generated Baked Meshes onto your Avatar's Mesh Renderers. Your original Avatar is still preserved in the Scene.
The generated Meshes will be placed in a sub-folder called BakedMeshes, located at each location of the original FBX files used on the Avatar.