Emission
Emission is a function that allows adding brightness directly to the base color of a mesh. It can be used to add highlights, or to add a glow effect to a mesh. This is one of the most well-known features found across different shaders.
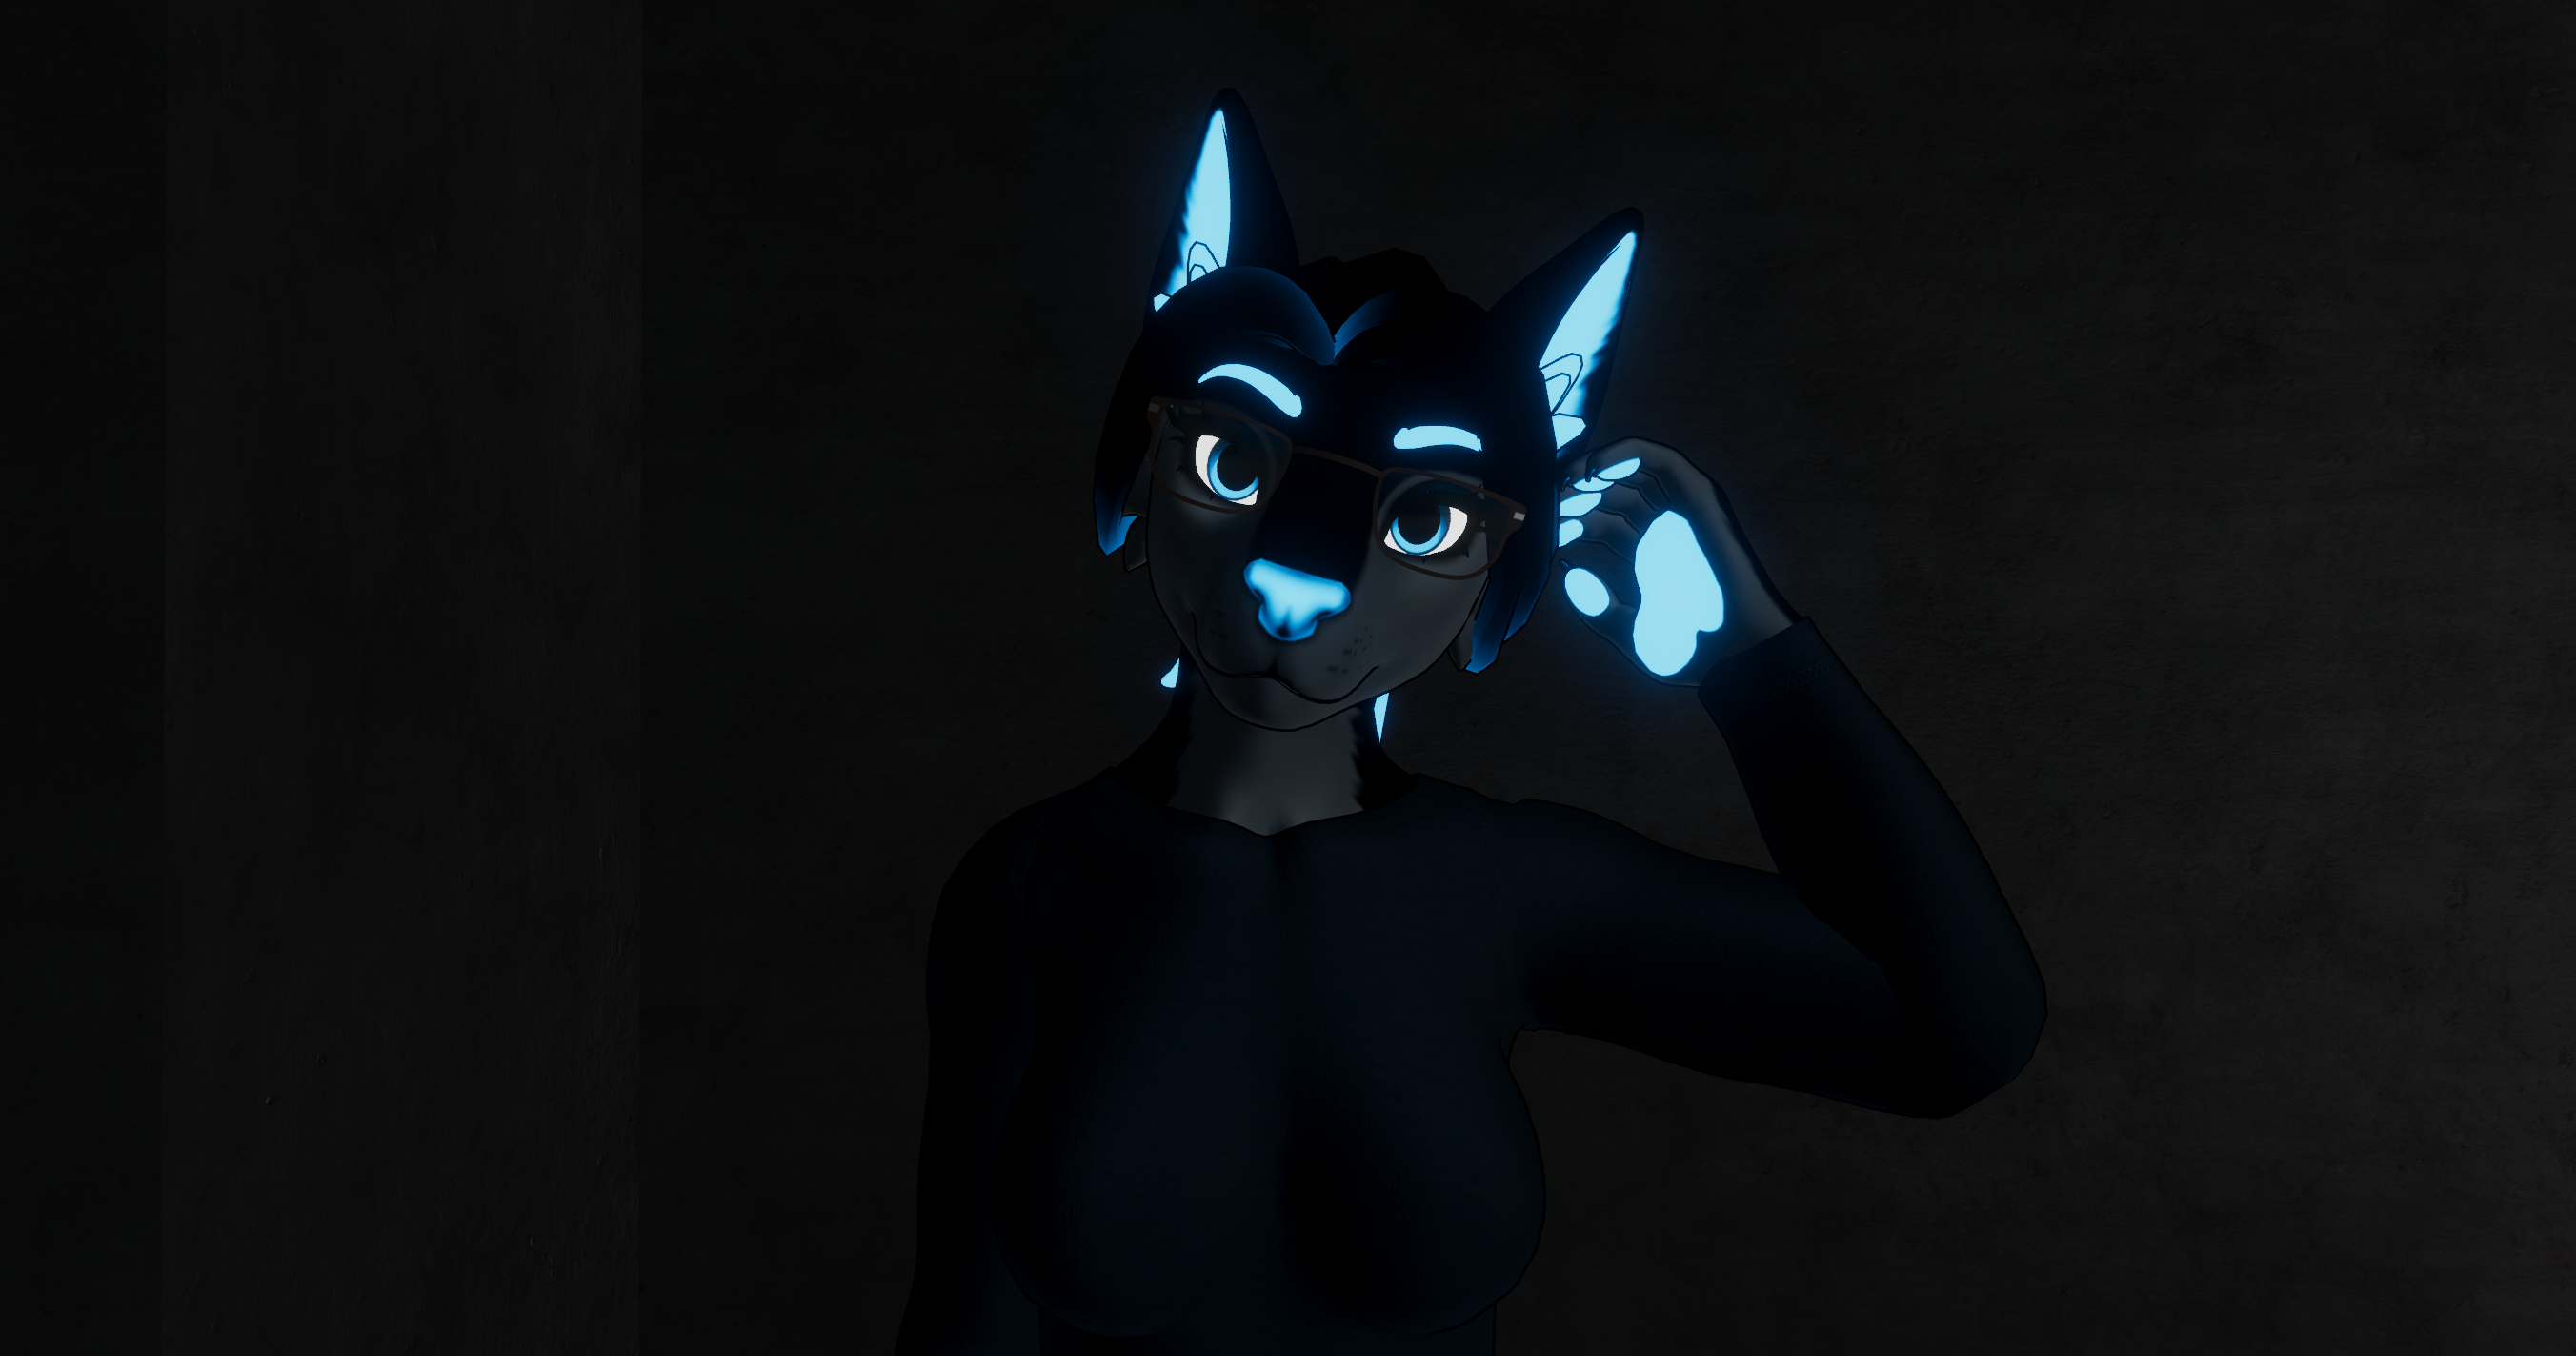
Example usage of Emission on the Eyes, Hair, Nose, Ears, and Paws.
Each of the 4 Emission slots (0, 1, 2, 3) have the following unique options listed below. They are independent of each other. Emissions are always added with one another when overlapping.
Emission Mask
Type: Data Texture (sRGB = Off)
Mask texture that defines where to place the emission effect. Black areas will not be affected by the emission, while white areas will be fully affected by the emission.
Please be aware that Fallback Shaders do not support Masking. If you are using Emission 0 slot, this property will NOT appear at all in your Fallback.
Global Mask
Type: Dropdown, Options:Off/1R/1G/1B/1A/2R/2G/2B/2A/3R/3G/3B/3A/4R/4G/4B/4A
Select which Global Mask to use as the Emission Mask instead.
Expand the Emission Mask slot from above to see this property.
Emission Color
Type: HDR Color
Tint color applied to the emission map. If no map is defined, this color will be used entirely.
This color is an HDR color, meaning it can have an intensity applied to make the color brighter than normal colors. This can be optionally used instead of, or in addition to, the Emission Strength option.
If you are using Emission 0 slot, please be aware that this property controls Emission Strength in Fallback Shaders.
If you leave Emission 0 disabled, ensure the Emission Color is set to Black to avoid your Avatar appearing extremely bright in your Fallback Shaders. This situation happens when users block your shaders via in-game Safety Settings.
You can safely use the other slots, Emission 1, 2, or 3, without affecting your Fallback Shaders.
Emission Map
Type: Color Texture (sRGB = On)
Color map of the emissions. This is used to define independent colors of your emissions in different areas on the mesh. Black areas will not be affected by the emission, while areas with color will be blended with the emission color.
Most commonly, this slot would be used in combination with Emission Color set to White.
If you are using Emission 0 slot, only your Emission Map will appear in Fallback Shaders.
Please keep this in mind when creating your Emissions. This only applies to Emission 0 slot.
Emission Strength
Type: Float, Range:0.0 - 20.0
Strength of the emission. Values greater than 1.0 will not change the base color as much, but will increase the amount the emission blooms (glows) in worlds with post processing enabled, and bloom configured.
Generally, this value should be set between 0.0 and 1.0 for a normal effect, and 1.0 to 5.0 for a more intense effect. Be careful when bringing this value too high, as doing so can cause the color to get washed out and/or be extremely blinding in Post Processing.
Use Base Colors
Type: Toggle
Applies the base color as a map. Useful for adding highlights to a mesh, especially in combination with an emission mask.
Override Base Color
Type: Toggle
If enabled, the base color of the mesh will be replaced with the emission color (calculated from the combined strength of all the emission sections with Replace Base Color enabled). This means that the mesh, in areas with intense emission, will take on the color of the emission.
Fluorescence
Type: Float, Range:0.0 - 1.0
Controls how the Emission brightness appears in dark environments. Therefore, Emission will only contribute it's brightness when your mesh is in the dark. This would essentially make it so that Emissions won't look extra-bright when there's lighting on it.
Fluorescence is a very basic slider. For more advanced control of Emission behavior in bright or dark environments, we recommend using the Light Based Emission settings.
Color Adjust
Type: Toggle
Enables hue shifting of the emission.
Color Space
Type: Dropdown, Options:OKLab/HSV
Choice of Color Space to use for the Hue Shift. By default, it will be set to OKLab.
Learn about the difference of Color Spaces as documented here in Color Adjust.
Select or Shift
Type: Dropdown, Options:Hue Select/Hue Shift- Default:
Hue Shift
- Default:
This dropdown allows you to select how the Color Adjustment should behave when the Hue Shift is used. By default, this will be set to Hue Shift.
Select or Shift Options
Hue Select: Directly applies the selected Hue as an override to the entire Emission.Hue Shift: Only tints the Emission based on the lerped value. This is the default behavior.
Saturation
Type: Float, Range:-1.0 - 10.0
Adjust the Saturation of the Hue Shift.
Hue Shift
Type: Float, Range:0.0 - 1.0
How much to shift the base color around the hue circle.
This value is circular, and will have the same result at 0 and 1.
Hue Shift Speed
Type: Float
How much to constantly shift the hue with time. A value of 1 will result in a full hue shift cycle every 20 seconds.
Center Out
Type: Toggle
Whether to change the emission mode to center out. This will make the emission move from the center of the mesh to the edges of the mesh, relative to the view direction and the mesh's normal. The emission map is used to create the center out map.
Flow Speed
Type: Float
How fast the center out effect should move.
Light Based
Type: Toggle
Enables Light Based emission. This allows modifying the emission based on the light intensity at different points on the mesh, or based on the world lighting.
The default settings define an emission that will glow in the dark, multiplying the emission intensity by 1.0 at 0.0 lighting intensity, decreasing to 0.0 at 1.0 lighting intensity.
Lighting Type
Type: Dropdown, Options:World/Mesh
Whether to use World or Mesh lighting as the basis. World type uses the light intensity of the probe being used, meaning it will be the same at all points on the mesh. Mesh type uses the intensity of lighting at each point on the mesh, which can be different at different points, such as in shadow.
Min Emission Multiplier
Type: Float, Range:0.0 - 1.0
Amount to multiply the emission by at the Min Lighting value.
Max Emission Multiplier
Type: Float, Range:0.0 - 1.0
Amount to multiply the emission by at the Max Lighting value.
Min Lighting
Type: Float, Range:0.0 - 1.0
Lighting intensity at which to use the Min Emission Multiplier.
Max Lighting
Type: Float, Range:0.0 - 1.0
Lighting intensity at which to use the Max Emission Multiplier.
Blinking
Type: Toggle
Enables Blinking of the emission. This allows the emission to blink at a certain rate without needing to explicitly animate it.
Mode
Type: Dropdown, Options:Smooth/Pulse
Choice of blinking behavior to use. By default, a smooth blinking transition is used. If set to Pulse, it will instead function in a PWM or Duty blink cycle.
Emissive Blink Min
Type: Float
Minimum multiplier for emissive blink. This is the amount the emission will be multiplied by at the low end of the blink cycle.
Emissive Blink Max
Type: Float
Maximum multiplier for emissive blink. This is the amount the emission will be multiplied by at the high end of the blink cycle.
Emissive Blink Velocity
Type: Float
How fast the blink cycle should move. This uses the sine of time, so a value of 1 will result in a blink cycle every 6.28 (Pi * 2) seconds or so. Higher values will result in a faster blink cycle.
Offset
Type: Float
Offset of the blink cycle in time. Useful for offsetting the blink cycle of different emission sections. This uses the sine of time, so a value of 6.28 (Pi * 2) will offset the blink cycle by 1 second. Higher values will result in a blink cycle that is offset by a larger amount of time.
Pulse Interval
Type: Float, Range:0.0 - 1.0- Default:
0.5 - Conditional: Requires Mode set to
Basic
- Default:
Sets the interval in how and when each blink is timed. This is similar to PWM or Duty cycle modes in electronic lighting modules.
Scrolling
Type: Toggle
Enables a scrolling emission effect. This creates a wave (or other pattern defined by a Curve) that travels in world space.
Use Curve
Type: Toggle
Enables the use of a Curve to define the scrolling wave shape.
Curve
Type: Data Gradient Texture (sRGB = Off)
Curve texture that defines the scrolling wave shape. By clicking the horizontal box, a curve editor will open that can create a curve texture.
VColor as position
Type: Toggle
Whether to use the vertex color to determine the position of the wave. If disabled, the position will be determined by world-space coordinates.
This option requires baking position data into the vertex color, which can be done with the Poi Vertex color baker.
Direction
Type: Vector4
Direction of the scrolling wave. This vector is in world space, with the X, Y, and Z values defining the direction of the wave. The W value is ignored. The higher the values of the directional components, the more dense the wave will be.
Width
Type: Float
Width of the wave; must be greater than 0. This value is unitless, and is constant regardless of the model scale. Smaller Width values result in a wider wave.
Velocity
Type: Float
How fast the wave should move. Higher values result in a faster wave. This value can be negative, which will cause the wave to move in the opposite direction.
Interval
Type: Float
How much distance there should be between each wave. This value is unitless, and is constant regardless of the model scale. Larger intervals result in more space between waves.
Offset
Type: Float
An offset applied to the wave. This value is unit-less, and depends on the velocity and interval values.
Audio Link
Type: Toggle
Enables or disables Emission Audio Link features.
The settings in this section will only be visible when Audio Link is activated on the Material.
Strength Multiplier
Adjusts the Emission Strength times(x) the defined value. This will use the equation, emissionStrength *= lerp.
Band
Type: Dropdown, Options:Bass/Low Mid/High Mid/Treble/Volume
Which band to use for the Audio Link Emission multiplier.
Multiplier
Type: Vector2- Default:
Min = 1,Max = 1
- Default:
How much to multiply the Emission Strength with Audio.
This is a mathematical value. Your multiplier must be at least 1 or greater for Audio Link Emissions to work by default.
If you change any of these to 0, Emissions may not be visible since there's nothing being multiplied.
| Modifier | Function |
|---|---|
| Min | Amount of Emission being multiplied with no audio |
| Max | Amount of Emission being multiplied with max audio |
Strength Add
Adjusts the Emission Strength by adding or subtracting from the current Emission Strength.
Band
Type: Dropdown, Options:Bass/Low Mid/High Mid/Treble/Volume
Which band to use for the Audio Link Emission adjustment.
Strength Add
Type: Vector2
How much to add to or subtract from the emission strength with audio.
| Modifier | Function |
|---|---|
| Min | Amount Added to Emission with no audio in Emission Band |
| Max | Amount Added to Emission with max audio in Emission Band |
Center Out
Makes the Emission move from the center of the mesh to the edges of the mesh, relative to the view direction and the mesh's normal. This feature functions completely separate from Center Out.
Band
Type: Dropdown, Options:Bass/Low Mid/High Mid/Treble/Volume
Which band to use for the Audio Link Center Out adjustment.
Strength
Type: Vector2
How much to add to or subtract from the center out strength with audio.
| Modifier | Function |
|---|---|
| Min | Amount Added to Emission with no audio in Center Out Band |
| Max | Amount Added to Emission with max audio in Center Out Band |
Intensity Threshold
Type: Float, Range:0.0 - 1.0
How high the audio intensity must be before being added to the center out strength. This can be used to create a "punchier" center out effect.
Duration
Type: Float, Range:-1.0 - 1.0
How much audio history should be used to calculate the center out. Lower values will result in a faster center out with less detail.