Locking and Animation
Poiyomi Shaders includes some back-end systems that are built with the intention of keeping your workflow optimized in Unity. This page will explain the importance of the Shader Locking feature, as well as how to animate Material Properties on your terms.
Shader Locking
At the top of a shader, there's a button labeled Lock In Optimized Shader. Pressing this will lock the shader, graying out any options that have not been marked for animation. This may take a few seconds to complete.
To unlock the shader, just press the button again. It'll be labeled as Unlock Shader.
Locked materials are significantly more optimized than their unlocked counterparts. The reason for this is because Locked Materials do not contain features that the creator isn't using. This essentially gives headroom for the shader to render quickly and more efficiently at runtime.
For Editor usage, unlocked materials have reduced performance due to all features being exposed. While this is acceptable for the creator editing their Materials, it's better that the Materials are Locked in the end. The more Materials you have unlocked, the higher the performance impact it will have in the Editor.
When uploading to VRChat, the Auto-Locking process runs automatically for any Poiyomi Materials found in an Avatar or World whenever a Build/Upload is triggered. This prevents unlocked materials from being uploaded with the final asset.
If you are uploading for the first time, a one-time message will appear informing you that the Materials are being automatically locked. It may look like this:
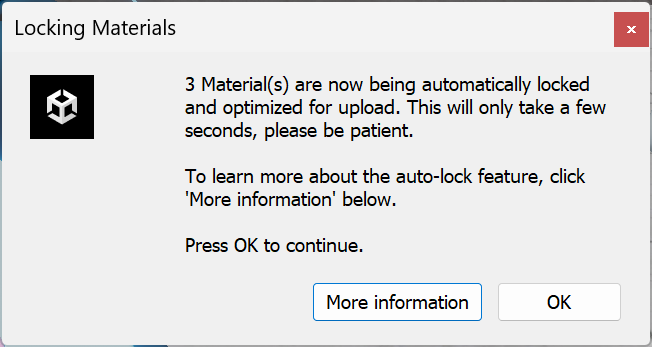
If this above message appears, click OK to continue the Upload.
Marking Properties for Animation
When the Material Locks, properties that are not animated will be optimized. If you need to animate a Material Property for any reason (such as a Hue Shift), you need to mark them appropriately so that the Shader Optimizer can account for it. Read below to learn how to do so.
You can only animate Materials via the Hierarchy!
Due to the way Unity works, make sure you always edit and interact with Materials directly on the Avatar's Mesh Renderers when creating your animations.
Animated
To animate a property on a Locked Material, you need to mark it as Animated. To do this, while the Material is Unlocked, Right-Click the property and select Animated (When Locked). This will add a green A next to the property (short for Animated).
Demonstration of Marking a Property as Animated.
In this above demonstration, we are attempting to animate the _MainHueShift property. Initially, it will not work because it was not tagged as such, and your Animator won't be able to touch it.
So in order to fix this, we must tag it as A. This allows us to directly interact with the _MainHueShift property at any time with the Material Locked, thus granting your Animator to be able to interact with it again.
When recording Animations that interact with a Material Property, don't forget to tag it to be Animated!
Rename Animated
By selecting Renamed (when locked), upon locking, the property will have a unique suffix based on the material's name. It will also add a green RA next to the property (short for Rename Animated) This means you can animate multiple materials with the same property differently on the same mesh.
Using Renamed (when locked) can be a way to animate multiple different Materials on the same Mesh without affecting all Material Slots.
Because RA properties are generated during optimization, it's extremely important to first Lock Materials BEFORE recording any Properties marked as RA for your Animation!
If you forget to do this, the Animator will assume the A Property Name instead while recording, which you probably don't want!
The unique suffix assigned for Properties marked as RA will depend on the name of the Material. For Example: If you're animating the Alpha slider on Decal 0 in a Material named Body Mat, the suffix of this property would be the name of the Material itself. If the name of the Material has space between each word, an underscore (_) will be appended between each word. Certain characters such as a dash (-) in Material Names may be treated differently. See Example Table below for reference on how the Properties are treated:
| Material Name | Property | A Property Name | RA Suffix | Renamed Property Name |
|---|---|---|---|---|
| "Body Mat" | Decal 0 -> Alpha | _DecalBlendAlpha | _Body_Mat | _DecalBlendAlpha_Body_Mat |
| "Body Mat" | Emission 0 -> Emission Strength | _EmissionStrength | _Body_Mat | _EmissionStrength_Body_Mat |
| "Suit Jacket" | Audio Link -> Anim Toggle | _AudioLinkAnimToggle | _Suit_Jacket | _AudioLinkAnimToggle_Suit_Jacket |
| "Outfit Shirt" | Color Adjust -> Hue Shift -> Hue Shift | _MainHueShift | _Outfit_Shirt | _MainHueShift_Outfit_Shirt |
If you wish to enforce a specific custom renaming scheme for RA properties, enable Allow custom renaming for locking under Thry Editor settings. This exposes a dedicated field on the top of the material inspector, where you can type in a custom suffix for the material to use instead.
Copying Properties for Animation
Copy Property as Keyframe
This option can be used to automatically generate a keyframe for a property on a specific renderer.
Select the renderer you'd like to animate them material of in the hierarchy, scroll down to the property in the materials list, and make sure it's marked for animation in the mode desired (standard or renamed).
Optionally, set the value to the value the keyframe should have. Then, select Copy Property as Keyframe, and paste it into the animation window.
If the property is set to Animated (when locked), the keyframe will be copied with the standard property name. If the property is set to Renamed (when locked), the keyframe will be copied with the renamed property.
Property Name Options
These options are mostly useful for shader debugging and development, as well as editor scripting. However, this will come in handy if you are using non-destructive editor tools that you program to interact with these material properties.
Copy Property Name
Copies the name of the property, as defined in the shader properties.
Copy Animated Property Name
Copies the name of the property, appending the renaming suffix if the property is set to Renamed (when locked).
Copy Animated Property Path
Copies the name of the property, appending the renaming suffix if applicable. If the renderer is a child of an object with an animator, it will copy the path with reference to the parent animator.
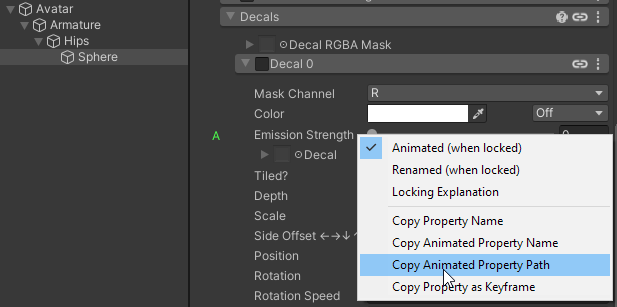
Selecting Copy Animated Property Path would copy the value Armature/Hips/Sphere/_DecalEmissionStrength .
Special Cases for Animation
Animating Vector/Color Channels
When animating vector channels (including color channels, texture tiling/offset options, panning, and many others), the keyframe will be applied to the entire vector/color channel by default. It's possible to remove unused channels by deleting them individually after creating the keyframe, but may require special considerations in your animator.
With Write Defaults enabled in your animator states, the vector/color channels will be set to the default value of the material if not animated in a specific state. This means you should be able to animate individual vector/color channels of a material without worrying about the unused channels.
With Write Defaults disabled in your animator states, the vector/color channels will not be set to the default value of the material if not animated in a specific state. If the state of each channel is not animated, this can lead to undefined behavior. It's best to explicitly animate the state of all 4 channels of a vector in a default animator state, then animate the channels individually in subsequent states. This will ensure that the channels are initialized to the correct value.
Unity Special Properties
Some properties in the shader are handled by Unity differently than most, and either cannot be animated, or can only be animated in a specific way. These are generally1 properties also used in Unity's Standard Shader, and are used to provide proper fallback behavior for VRChat's Shader Blocking and Fallback System.
The following table provides a list of features that will be animated on all materials on a renderer regardless of their lock state. For certain values, they can be renamed for animation (and, if necessary, will have a dummy version of the original, un-renamed version for fallback shaders).
This behavior is not a bug, it's behavior defined by Unity, beyond the control of the shader author (given the need to name these properties specifically for fallback shaders to work correctly).
| Property Name | Can be Renamed? | Property |
|---|---|---|
_Color | ✅ | Main Color |
_MainTex_ST | ❌ | Main Texture Tiling/Offset |
_BumpMap_ST | ❌ | Normal Map Tiling/Offset |
_BumpScale | ✅ | Normal Map Intensity |
_Cutoff | ✅ | Alpha Cutoff |
_DetailMask_ST | ❌ | Detail Mask Tiling/Offset |
_DetailNormalMap_ST | ❌ | Detail Mask Tiling/Offset |
_DetailNormalMapScale | ✅ | Detail Mask Tiling/Offset |
_EmissionColor | ✅ | Emission 0 Color |
_EmissionMap_ST | ❌ | Emission 0 Map Tiling/Offset |
Non-Animatable Properties
Some properties cannot be animated at runtime in the same way as most, due to the way they function. You may be able to create keyframes that change these properties, but they will not work at runtime.
To adjust these properties at runtime, you'll need to create different materials with the different settings. These can then be animated to change on the material, though older versions of Unity (2021 and older) had issues with animating material slots on a renderer - notably, the slot labeled "Element 4" cannot be animated without the slot labeled "Material 2" changing2. This issue was fixed in Unity 2022.
Section Header Checkboxes

These section checkboxes signal the shader to add and remove code. Thus, they cannot be animated at runtime whatsoever.
If you want to toggle the effect of a section, use a property that controls the overall effect. For example,
- To disable Color Adjust, you could animate the settings to their default values.
- To disable a Decal, animate its
Alphavalue to0. If the Decal has Emissions, also animate itsEmission Strengthvalue to0. - To disable Audio Link, animate the
Anim Toggleto be un-checked.
For other sections, make sure to refer to the appropriate documentation pages on them so that you can know which properties you should animate as a toggle.
Keyword Toggle Checkboxes
These include anything that toggles a Keyword, which is generally reserved for large changes in features, or the addition of texture slots. These also add and remove code from the shader, and cannot be animated at runtime.
- RGBA Masking: Enable Normals
- Light Data: Enable Additive
- Light Data: Ignore Directional
- Light Data: Debug
- Shading: Lighting Type
- Shading: (Cloth Mode) Clothmask Lerp
- Matcap: Custom Normal
Rendering/Low Level Options
These options relate to low-level directives and settings that change how the graphics driver interprets the shader, and generally cannot be adjusted at runtime.
- Lock/Unlock Shader
- Rendering Preset
- Rendering: Cull
- Rendering: ZTest
- Rendering: ZWrite
- Rendering: Color Mask
- Rendering: Offset Factor
- Rendering: Offset Units
- Rendering: Reduce Clip Distance
- Rendering: Ignore Fog
- Rendering: Enable GPU Instancing
- Rendering: RGB Blend Op
- Rendering: Alpha Blend Op
- Rendering: Source Blend
- Rendering: Destination Blend
- Rendering: Stencil Reference Value
- Rendering: Stencil ReadMask Value
- Rendering: Stencil WriteMask Value
- Rendering: Stencil Pass Op
- Rendering: Stencil Fail Op
- Rendering: Stencil ZFail Op
- Rendering: Stencil Compare Function
- VRChat Fallback Shader
- Render Queue
Technical Details
The locking feature uses an optimization procedure developed by Kaj. When the shader is locked in, a unique version is generated that removes unused code, defines fixed values for non-animated shader properties, and defined unused texture slots to be fixed values.
This significantly improves performance, helps mitigate the 64 texture slot crash sometimes seen when many complex materials with lots of modules enabled are present in a scene.